Blog

  • keith-number-finder

    Kieth Number Finder

    A quick tool to find keith numbers. http://mathworld.wolfram.com/KeithNumber.html

    def checker(num)
    

    This part creates a new function by the name of “checker” and it takes an input which is the number it will check to see if it’s keith number. The next 4 bottom parts are part of this function.

    stringnum = str(num)
    
    arraynum = list(map(int, stringnum))
    
    sumnum = sum(arraynum)
    

    This part is where some variables get declared so it will be easier for us to use later on. The stringnum variable is taking the number that you inputed and converting it into a string from an integer. This is so that the next variable declaration will work, arraynum. This variable converts the integer that was inputted and turns each digit into parts of an array, now the variable that we are converting must be a string or it will not work, that is the purpose of the stringnum variable. This variable also converts the array into a integer format after it becomes an array so that the digits inside may be added up. The variable sumnum takes all of the digits in the array and adds them up so it can be used later on.

    while sumnum < num:
    

    This part declares the opening of a “while loop” which only loops the code inside as long as the condition is met. In this case, the condition is as long as the variable, “sumnum” is smaller than the variable, “num” the loop will run. This is useful so if that sum of the the array becomes greater than the number we originally inputted, the computer knows that this number is not a keith number and moves on to the next.

    arraynum = arraynum[1:] + [sumnum]
    
    sumnum = sum(arraynum)
    

    This is a very important part. What it does is it replaces the last value in the array with the sum of all the digits in the array, mind you this doesn’t increase the number of digits, it only replaces. This is why it will work with numbers that have even x digits because the number of numbers being added up is always in relation to the number inputted.

    For example: If number inputted is 197, then the array at first is, [1,9,7]. Then after the loop is run once, the array is [9,7,17]. This works just like the way we were taught in class in which we would write it out as:

    197 - 1 + 9 + 7 = 17
    
    9 + 7 + 17 = blah, blah, blah


    if (sumnum == num):
    
    print str(num)  + " is a keith number"
    

    This is the part that actually validates if the number is a keith number by checking if the sum of all the numbers in the array equals to the starting number

    count = int(raw_input("\nAt what number would you like to stop at?: "))
    

    This asks you, at which number would you like the program to stop running.

    value = 9
    

    This sets the first number it checks to 9(technically 10, because in the loop 1 gets added to this variable before it gets checked) as keith numbers cannot be single-digit.

    while (value <= count):
    
        value += 1
       checker(value)
    

    This is the main loop of the program which keeps increasing the value that it checks by one until it reaches the value you entered, at which point, it moves to the last point of the program and ends.

    Program’s Output:

    At what number would you like to stop at?: 1000000000000000000000000000000000000000000

    14 is a keith number

    19 is a keith number

    28 is a keith number

    47 is a keith number

    61 is a keith number

    75 is a keith number

    197 is a keith number

    742 is a keith number

    1104 is a keith number

    1537 is a keith number

    2208 is a keith number

    2580 is a keith number

    3684 is a keith number

    4788 is a keith number

    7385 is a keith number

    7647 is a keith number

    7909 is a keith number

    31331 is a keith number

    34285 is a keith number

    34348 is a keith number

    55604 is a keith number

    62662 is a keith number

    86935 is a keith number

    93993 is a keith number

    120284 is a keith number

    129106 is a keith number

    147640 is a keith number

    156146 is a keith number

    174680 is a keith number

    183186 is a keith number

    298320 is a keith number

    355419 is a keith number

    694280 is a keith number

    925993 is a keith number

    1084051 is a keith number

    7913837 is a keith number

    11436171 is a keith number

    33445755 is a keith number

    44121607 is a keith number

    129572008 is a keith number

    251133297 is a keith number

    Number of keith numbers: 42

    Duration: 5 hours

    Visit original content creator repository
    https://github.com/maltseasy/keith-number-finder

  • Debian-Hyprland

    💌 KooL’s Debian-Hyprland Install Script 💌

    For Debian 13 Trixie (Testing) and SID (unstable)

    GitHub Repo stars GitHub last commit GitHub repo size


    👇 KOOL’s Hyprland-Dots related Links 👇

    Sparkles KooL Hyprland-Dotfiles Showcase Sparkles

    showoff-dots.mp4

    NOTE: Ubuntu-Hyprland install script has its own repo now

    Gallery and Videos

    🎥 Feb 2025 Video explanation of installation with preset

    Important

    install a backup tool like snapper or timeshift. and Backup your system before installing hyprland using this script (HIGHLY RECOMMENDED).

    Caution

    Download this script on a directory where you have write permissions. ie. HOME. Or any directory within your home directory. Else script will fail

    ⚠️ Pre-requisites and VERY Important!

    • Do not run this installer as sudo or as root
    • This Installer requires a user with a priviledge to install packages
    • Needs a Debian 13 Testing (Trixie) Branch as it needs a newer wayland packages! I have tried on Stable Debian 12 Bookworm in which, Hyprland wont build.
    • edit your /etc/apt/sources.list and remove # on lines with deb-src to enable source packaging else will not install properly especially Hyprland
    sudo nano /etc/apt/sources.list
    • delete # on the lines with ‘deb-src’
    • ensure to allow to install non-free drivers especially for users with NVIDIA gpus. You can also install non-free drivers if required. Edit install-scripts/nvidia.sh and change the nvidia stuff’s if required

    🪧🪧🪧 ANNOUNCEMENT 🪧🪧🪧

    • 25 July 2025 Update!

    • All Hyprland and associated packages set to install using this script are downloaded and built from source (github). However, do note that it is downloaded from each individual releases. You can set versions by editing the scripts located install-scripts directory.

    • These packages are NOT updated automatically. You need to manually update it yourself

    • This Repo does not contain Hyprland Dots or configs! Pre-configured Dotfiles are on Hyprland-Dots . During installation, if you opt to copy pre-configured dots, it will be downloaded from that centralized repo.

    • Hyprland-Dots use are constantly evolving / improving. you can check CHANGELOGS here Hyprland-Dots-Changelogs

    • Since the Hyprland-Dots are evolving, some of the screenshots maybe old

    • the wallpaper offered to be downloaded towards the end is from this WALLPAPER-REPO

    ✨ Some notes on this installer / Prerequisites

    • This script is meant to install in Debian Testing (Trixie) and Debian Unstable (SID). This script Will NOT work with Bookworm
    • If However, decided to try, recommend to install SDDM. Apart from GDM and SDDM, any other Login Manager may not work nor launch Hyprland. However, hyprland can be launched through tty by type Hyprland
    • 🕯️ network-manager-gnome (nm-applet) has been removed from the packages to install. This is because it is known to restart the networkmanager causing issues in the installation process. After you boot up, inorder to get the network-manager applet, install network-manager-gnome. sudo apt install network-manager-gnome See below if your network or wifi became unmanaged after installation
    • If you have nvidia, and wanted to use proprietary drivers, uninstall nouveau first (if installed). This script will be installing proprietary nvidia drivers and will not deal with removal of nouveau.
    • NVIDIA users / owners, after installation, check THIS

    ✨ Costumize the packages to be installed

    • inside the install-scripts directory, you can edit 01-hypr-pkgs.sh. Do not edit 00-dependencies.sh unless you know what you are doing. Care though as the Hyprland Dots may not work properly!

    🚩 changing login manager to SDDM

    • if you really want to change login manager, there are couple of things you need to carry out before running this install script
    • first install sddm. the no-install-recommends is suggested else it will pull lots of plasma depencies.
    sudo apt install --no-install-recommends -y sddm
    • then ran sudo dpkg-reconfigure sddm choose sddm and then reboot.
    • once reboot done, you can ran the script and choose sddm & sddm theme
    • LINK for some guide

    💫 SDDM and GTK Themes offered

    • If you opted to install SDDM theme, here’s the LINK which is a modified fork of LINK
    • If you opted to install GTK Themes, Icons, here’s the LINK. This also includes Bibata Modern Ice cursor.

    🔔 NOTICE TO NVIDIA OWNERS

    • by default it is installing the latest and newest nvidia drivers. If you have an older nvidia-gpu (GTX 800 series and older), check out nvidia-debian website LINK and edit nvidia.sh in install-scripts directory to install proper gpu driver

    Important

    If you want to use nouveau driver, Dont select Nvidia in the options. This is because the nvidia installer part, it will blacklist nouveau. Hyprland will still be installed but it will skip blacklisting nouveau.

    Important

    Another important note for nvidia owners If you have nvidia, by default debian is installing nouveau or open-source nvidia driver. If you want to keep the default nvidia driver installed by Debian, Dont select Nvidia in the options.

    ✨ Auto clone and install

    Caution

    If you are using FISH SHELL, DO NOT use this function. Clone and ran install.sh instead

    • you can use this command to automatically clone the installer and ran the script for you
    • NOTE: curl package is required before running this command
    sh <(curl -L https://raw.githubusercontent.com/JaKooLit/Debian-Hyprland/main/auto-install.sh)

    ✨ to use this script

    clone this repo (latest commit only) by using git. Change directory, make executable and run the script

    git clone --depth=1 https://github.com/JaKooLit/Debian-Hyprland.git ~/Debian-Hyprland
    cd ~/Debian-Hyprland
    chmod +x install.sh
    ./install.sh

    💥 💥 UNINSTALL SCRIPT / Removal of Config Files

    • 11 March 2025, due to popular request, created a guided uninstall.sh script. USE this with caution as it may render your system unstable.
    • I will not be responsible if your system breaks
    • The best still to revert to previous state of your system is via timeshift of snapper

    ✨ for ZSH and OH-MY-ZSH installation

    installer should auto change your default shell to zsh. However, if it does not, do this

    chsh -s $(which zsh)
    zsh
    source ~/.zshrc
    • reboot or logout
    • by default xiong-chiamiov-plus theme is installed. You can find more themes from this OH-MY-ZSH-THEMES
    • to change the theme, edit ~/.zshrc ZSH_THEME=”desired theme”

    ✨ TO DO once installation done and dotfiles copied

    • SUPER H for HINT or click on the waybar HINT! Button

    • Head over to FAQ and TIPS

    • if you installed in your laptop and Brightness and Keyboard brightness does not work you can execute this command sudo chmod +s $(which brightnessctl)

    ✨ Packages that are manually downloaded and build. These packages will not be updated by apt and have to be manually updated

    • Asus ROG asusctl LINK and superfxctl LINK
    • swww LINK
    • hyprlock LINK #22 Aug 2024 – still not on repo
    • hypridle LINK #22 Aug 2024 – still not on repo
    • rofi-wayland LINK
    • wallust LINK

    Tip

    To update to latest packages, re-running this script will auto update all. Script is configured to pull latest packages build for you.

    🤬 FAQ

    Most common question I got is, Hey Ja, Why the heck it is taking long time to install? Other distro like Arch its only a minute or two. Why here takes like forever?!?!?!

    • Well, most of the core packages are downloaded and Build and compiled from SOURCE. Unlike Other distros, they already have prepacked binary that can just download and install.

    🛎 *** DEBIAN and UBUNTU Hyprland Dots UPDATING NOTES ***

    Important

    This is very Important for Debian and Ubuntu Dots

    • Some parts of KooL’s Hyprland Dots LINK are not compatible on Debian and Ubuntu especially the hyprland settings.

    • That is the reason the DOTS for those distro’s are “fixed” and they are being pulled on different branch of KooL Dots.

    • To update your KooL’s Dots follow this WIKI

    Note

    This script does not setup audio. Kindly set up. If you have not, I recommend pipewire. sudo apt install -y pipewire

    🎞️ AGS Overview DEMO

    • in case you wonder, here is a short demo of AGS overview Youtube LINK

    ✨ TO DO once installation done and dotfiles copied

    🙋 Got a questions regarding the Hyprland Dots or configurations? 🙋

    • Head over to wiki Link WIKI

    ⌨ Keybinds

    Tip

    KooL Hyprland has a searchable keybind function via rofi. (SUPER SHIFT K) or right click the HINTS waybar button

    🙋 👋 Having issues or questions?

    • for the install part, kindly open issue on this repo
    • for the Pre-configured Hyprland dots / configuration, submit issue here

    🔧 Proper way to re-installing a particular script from install-scripts directory

    • CD into Debian-Hyprland DIrectory and then ran the below command.
    • i.e. ./install-scripts/gtk-themes.sh – to reinstall GTK Themes or
    • ./install-scripts/sddm.sh – to reinstall sddm

    Important

    DO NOT CD into install-scripts directory as script as it will fail. Scripts are designed to ran outside install-scripts directory for installation logging purposes.

    🎞️ AGS Overview DEMO

    • in case you wonder, here is a short demo of AGS overview Youtube LINK

    🛣️ Roadmap:

    • possibly adding gruvbox themes, cursors, icons

    ⁉️ KNOWN ISSUE

    • hypridle wont build (Feb 2025)

    ❗ some known issues for nvidia

    • reports from members of my discord, states that some users of nvidia are getting stuck on sddm login. credit to @Kenni Fix stated was
     while in sddm press ctrl+alt+F2 or F3
    log into your account
    `lspci -nn`, find the id of your nvidia card
    `ls /dev/dri/by-path` find the matching id
    `ls -l /dev/dri/by-path` to check where the symlink points to 
    )
    
    • add “env = WLR_DRM_DEVICES,/dev/dri/cardX” to the ENVvariables config ~/.config/hypr/UserConfigs/ENVariables.conf ; X being where the symlink of the gpu points to

    • more info from the hyprland wiki Hyprland Wiki Link

    • reports from a member of discord for Nvidia for additional env’s

    • remove # from the following env’s on

    env = GBM_BACKEND,nvidia-drm
    env = WLR_RENDERER_ALLOW_SOFTWARE,1
    

    🫥 Improving performance for Older Nvidia Cards using driver 470

    ❗ other known issues

    Note

    Auto start of Hyprland after login (no SDDM or GDM or any login managers)

    • This was disabled a few days ago. (19 May 2024). This was because some users, after they used the Distro-Hyprland scripts with other DE (gnome-wayland or plasma-wayland), if they choose to login into gnome-wayland for example, Hyprland is starting.
    • to avoid this, I disabled it. You can re-enable again by editing ~/.zprofile . Remove all the # on the first lines
    • ROFI issues (scaling, unexplained scaling etc). This is most likely to experience if you are installing on a system where rofi is currently installed. To fix it uninstall rofi and install rofi-wayland . sudo apt autoremove rofi .
    • Install rofi-wayland with
    cd ~/Debian-Hyprland
    ./install-scripts/rofi-wayland.sh
    • Rofi-wayland is compatible with x11 so no need to worry.

    • Does not work in Debian Bookworm

    • sddm blackscreen when log-out

    • Installing SDDM if or any other Login Manager installed. See Issue 2 - SDDM

    • network is down or become unmanaged This might help

    📒 Final Notes

    • join my discord channel Discord
    • Feel free to copy, re-distribute, and use this script however you want. Would appreciate if you give me some loves by crediting my work 🙂

    ✍️ Contributing

    • As stated above, these script does not contain actual config files. These are only the installer of packages
    • If you want to contribute and/or test the Hyprland-Dotfiles (development branch), Hyprland-Dots-Development
    • Want to contribute on KooL-Hyprland-Dots Click HERE for a guide how to contribute
    • Want to contribute on This Installer? Click HERE for a guide how to contribute

    👍👍👍 Thanks and Credits!

    • Hyprland Of course to Hyprland and @vaxerski for this awesome Dynamic Tiling Manager.

    💖 Support

    • a Star on my Github repos would be nice 🌟

    • Subscribe to my Youtube Channel YouTube

    • you can also give support through coffee’s or btc 😊

    ko-fi

    or

    "Buy Me A Coffee"

    Or you can donate cryto on my btc wallet 🙂

    1N3MeV2dsX6gQB42HXU6MF2hAix1mqjo8i

    Bitcoin

    📹 Youtube videos (Click to view and watch the playlist) 📹

    Youtube Playlist Thumbnail

    🥰🥰 💖💖 👍👍👍

    Stargazers over time

    Visit original content creator repository https://github.com/JaKooLit/Debian-Hyprland
  • TStack.RedisExchange

    Overview

    The purpose of this library is to store cache data, the infrastructure “StackExchange.Redis” is fed, but this library offers more generic and clean architecture. This library was developed .NET Standard.

    Covarage

    • StringSet
    • SortedSet
    • Set

    Installation

    Nuget Package

    Package Manager

    Install-Package TStack.RedisExchange -Version 1.0.3

    .NET CLI

    dotnet add package TStack.RedisExchange --version 1.0.3

    PackageReference

    <PackageReference Include="TStack.RedisExchange" Version="1.0.3" />

    Paket CLI

    paket add TStack.RedisExchange --version 1.0.3

    Usage

    This library supports cluster mode, for usage follow steps.

    Step One

    Define Redis Context Config

    public class RedisContext : RedisContextConfig
    {
        public RedisContext() : base(new List<RedisServer> { new RedisServer("localhost", 6379)}, "", "ClientName", 15000, 15000)
        {
    
        }
    }

    Step Two

    Define Provider

    public class ProjectProvider : RedisProvider<RedisContext>
    {
    
    }

    Ready to use.

    Fundamentals

    All redis functions need a key parameter for keep data, so you can access with this data from cache from key parameter.

    An example for StringSet

    ProjectProvider _provider = new ProjectProvider();
    Person person = new Person("ferhat","candas");
    var expire = new TimeSpan(0, 0, 5);
    provider.Add("stringsetkey", person, expire);

    For more example, than look tests

    Author

    Ferhat Candaş – Software Developer

    Visit original content creator repository
    https://github.com/ferhatcandas/TStack.RedisExchange

  • uks-instructions

    Caution

    This repository has been archived. All content from this repository has been migrated to UpCloud’s product documentation and product tutorials.

    UpCloud Kubernetes Service examples

    This repository contains sample configurations for Terraform and Kubernetes manifests to get started with our UpCloud Kubernetes Service (UKS).

    Note that this repository is still evolving. Please check back once in a while and also familiarise yourself with the known issues. This repository will continue to exist while we are building better documentation with examples.

    Creating your first cluster

    UI

    The simplest way to create a cluster is to use our Control Panel. You can do so by following these steps:

    • Log in to the UpCloud Control Panel.
    • Go to Kubernetes page using the left-hand side menu.
    • Click Create new cluster.
    • Select a Private Network for your Worker Nodes. This network should be in the same zone as the cluster you are creating. The network can not be connected to an existing cluster, can not have an attached router, and should have DHCP enabled with default route from DHCP disabled. For IP network of your SDN network, you can use for example 172.24.1.0/24.
    • Create a node group or use the default node-group; node group is a group of workers with identical image templates.
    • Name your cluster.
    • Click Create button.
    • Cluster creation will take a few minutes as worker nodes are being provisioned and a DNS record is prepared.
    • When the cluster is running, you can download your cluster’s kubeconfig file; it allows you to access your cluster easily via command line with kubectl. See Exposing Services for example on deploying an Hello UKS application to your newly created cluster.

    Alternatives

    You can also create a cluster using the following ways:

    Kubeconfig

    You can get your kubeconfig by going to your cluster details page in Control Panel.
    Alternatively, if you use Terraform you can leverage local_file provider to create kubeconfig file after the cluster is deleted (see terraform example)

    Exposing Services

    UpCloud Managed Load Balancer

    See ccm/README.md.

    Ingress NGINX controller

    See ingress-nginx/README.md.

    Persistent storage

    See storage/README.md.

    Autoscaling

    See autoscaling/README.md.

    Migration

    See migration/README.md.

    Troubleshooting

    See KNOWN_ISSUES.md

    Visit original content creator repository
    https://github.com/UpCloudLtd/uks-instructions

  • settlers-w2

    settlers-w2

    movers website with to pages

    By robin musyoki

    Table of Content

    Description

    This project is a web application for movers company that shows details about the services it offers, has information about the contacts, a login section and work done

    [Go Back to the top](#movers-company)
    ## Features
    As a user of the application,you will be able to :
    1. See a description of what the services offered by the movers
    1. Can make inquiry through a contactng.
    [Go Back to the top](#movers-company)
    [Go Back to the top](#movers-company)
    ### Requirements
    * Access to a computer or any other garget
    * Access to internet
    ### Installation Process
    ****
    * Clone to thir repo :
    * Unzip the downloaded files in a folder of choice.
    * Open the index file from the zipped file with any browser.
    ****
    [Go Back to the top](#movers-company)
    ### Live Link
    – Click this link section to view live link.
    ### Technology Used
    * HTML – which was used to develope the structure off the pages.
    * CSS – which was used to style the User Interface.

    Go Back to the top

    Known Bugs

    • Mailchimp API does not function correctly as expected.

    Licence

    MIT License
    Copyright (c) [2022] [robin musyoki]
    Permission is hereby granted, free of charge, to any person obtaining a copy
    of this software and associated documentation files (the “Software”), to deal
    in the Software without restriction, including without limitation the rights
    to use, copy, modify, merge, publish, distribute, sublicense, and/or sell
    copies of the Software, and to permit persons to whom the Software is
    furnished to do so, subject to the following conditions:
    The above copyright notice and this permission notice shall be included in all
    copies or substantial portions of the Software.
    THE SOFTWARE IS PROVIDED “AS IS”, WITHOUT WARRANTY OF ANY KIND, EXPRESS OR
    IMPLIED, INCLUDING BUT NOT LIMITED TO THE WARRANTIES OF MERCHANTABILITY,
    FITNESS FOR A PARTICULAR PURPOSE AND NONINFRINGEMENT. IN NO EVENT SHALL THE
    AUTHORS OR COPYRIGHT HOLDERS BE LIABLE FOR ANY CLAIM, DAMAGES OR OTHER
    LIABILITY, WHETHER IN AN ACTION OF CONTRACT, TORT OR OTHERWISE, ARISING FROM,
    OUT OF OR IN CONNECTION WITH THE SOFTWARE OR THE USE OR OTHER DEALINGS IN THE
    SOFTWARE.
    Go Back to the top

    Visit original content creator repository
    https://github.com/msk-robin/settlers-w2

  • React-Compiler-playground-app

    React Compiler playground app ✨✨✨

    This project provides a minimal setup for a React 19 app powered by React Compiler. In this developer playground you can prototype and test how React Compiler will optimize re-renders in React applications.

    Quick start

    npm install
    npm run dev

    In ./src/App.jsx you can add components you want to test. You can use console.log to check which components re-render and when.

    Checking if components have been optimized

    You can use React Devtools (v5.0+), which has built-in support for React Compiler and will display a “Memo ✨” badge next to components that have been optimized by the compiler.

    In React Devtools, you can also enable “Highlight updates when components render” option for a visual indication when components rerender (However, I found that it does not always accurately work with components optimized by React Compiler, so using console.log to check if the component is re-rendered seems more reliable as of now).

    Checking how components have been optimized

    Minification is disabled in this project, so when you don’t understand why some components are being re-rendered when you think they shouldn’t, you can build this project with npm run build and examine the dist folder to see the output of the React Compiler (open ./dist/assets/index-*.js and scroll to the bottom).

    You can also copy your code to React Compiler online playground and see the compilation result there.

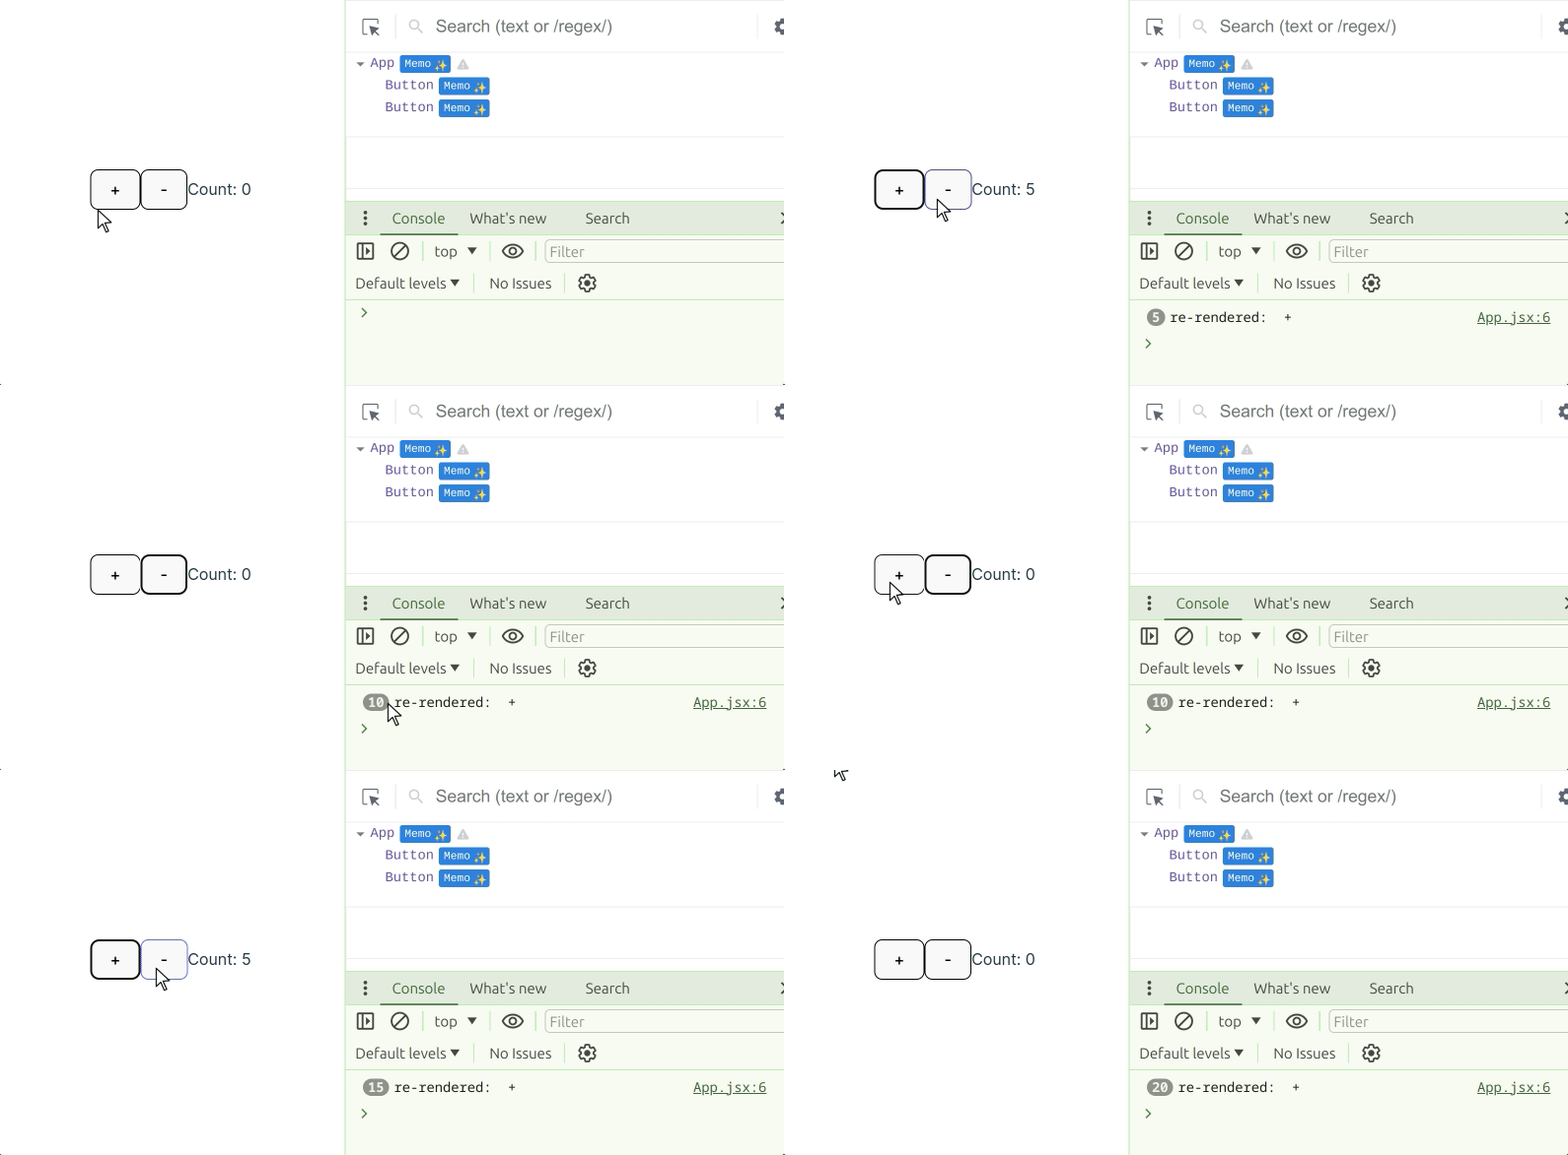
    Running app example

    Example of the project running and how it can be used to detect unexpected behavior of React Compiler:

    running_app_example

    Read more about it in this article about React Compiler common memoization “gotcha”.

    How the project is setup

    https://react.dev/learn/react-compiler#usage-with-vite

    Visit original content creator repository https://github.com/toli444/React-Compiler-playground-app
  • AWS-CLF-C02

    AWS Certified Cloud Practitioner CLF-C02

    AWS Roadmap

    AWS Service Regions and Global Services

    AWS has Global Services:

    • Identity and Access Management (IAM)
    • Route 53 (DNS service)
    • CloudFront (Content Delivery Network)
    • WAF (Web Application Firewall)

    Most AWS services are Region-scoped:

    • Amazon EC2 (Infrastructure as a Service)
    • Elastic Beanstalk (Platform as a Service)
    • Lambda (Function as a Service)
    • Rekognition (Software as a Service)

    IAM Policies Structure

    Consists of

    • Version: policy language version, always include “2012-10-17”
    • id: an identifier for the policy (optional)
    • Statement: one or more individual statements (required)

    Statements consists of

    • Sid: an identifier for the statement (optional)
    • Effect: whether the statement allows or denies access (Allow, Deny)
    • Principal: account/user/role to which this policy applied to
    • Action: list of actions this policy allows or denies
    • Resource: list of resources to which the actions applied to
    • Condition: conditions for when this policy is in effect (optional)

    Example:

    Classic Ports to know

    • 22 = SSH (Secure Shell) – log into a Linux instance
    • 21 = FTP (File Transfer Protocol) – upload files into a file share
    • 22 = SFTP (Secure File Transfer Protocol) – upload files using SSH
    • 80 = HTTP – access unsecured websites
    • 443 = HTTPS – access secured websites
    • 3389 = RDP (Remote Desktop Protocol) – log into a Windows instance.

    Shared Responsibility Model

    Root user privileges

    • Lock away your AWS account root user access keys!
    • Actions that can be performed only by the root user:
      • Change account settings (account name, email address, root user password, root user access keys).
      • Close your AWS account.
      • Change or cancel your AWS Support plan Register as a seller in the Reserved Instance Marketplace.

    Architecture Diagram:

    Total Cost of Ownership

    What is TCO?

    • TCO (Total Cost of Ownership) represents the total cost of using and maintaining a system over its entire lifecycle.
    • It includes direct costs (hardware, software, operational) and indirect costs (training, downtime, inefficiencies).

    Key Components of TCO

    1. Direct Costs

    • Infrastructure costs:
      • Servers, storage, networking equipment.
    • Software licenses:
      • Operating systems, databases, middleware.
    • Operational costs:
      • Power, cooling, physical space.

    2. Indirect Costs

    • Maintenance and support:
      • Updates, patching, vendor support contracts.
    • Downtime costs:
      • Loss of productivity or revenue due to outages.
    • Training and staffing:
      • Onboarding and upskilling IT teams.

    AWS TCO Benefits

    AWS provides several benefits that lower TCO compared to traditional on-premises IT:

    1. Pay-as-You-Go Pricing

    • No upfront capital expenses.
    • Pay only for what you use (compute, storage, etc.).

    2. Reduced Hardware and Maintenance

    • No need to buy physical servers, storage, or networking equipment.
    • AWS handles maintenance and updates.

    3. Scalability

    • Scale up or down based on demand, reducing wasted capacity.
    • Avoid overprovisioning.

    4. Managed Services

    • AWS services (like RDS, Lambda, or DynamoDB) reduce operational overhead.
    • Focus on applications, not infrastructure.

    Tools for Calculating AWS TCO

    AWS provides tools to estimate TCO and compare costs with on-premises setups:

    1. AWS TCO Calculator:
      • Compares AWS costs with on-premises infrastructure.
      • Consider storage, compute, network, and labor costs.
    2. AWS Pricing Calculator:
      • Estimates the costs of AWS services for specific workloads.

    TCO Optimization Strategies

    1. Right-sizing resources:
      • Match resource types and sizes to workload needs.
    2. Use Reserved Instances or Savings Plans:
      • Commit to a 1- or 3-year term to get discounted rates.
    3. Leverage Spot Instances:
      • Use spare capacity for non-critical or flexible workloads.
    4. Enable Auto Scaling:
      • Automatically adjust resources based on demand.
    5. Migrate to Managed Services:
      • Use services like Amazon RDS or Lambda to reduce operational costs.

    Exam Tips:

    • Focus on how AWS reduces TCO compared to traditional on-premises environments.
    • Be familiar with AWS services and their cost-saving features (e.g., Auto Scaling, Spot Instances).
    • Know how to use the AWS TCO Calculator for comparison.

    Visit original content creator repository
    https://github.com/thekirankumarv/AWS-CLF-C02

  • flow-sentry

    MIT license Packagist Maintenance level: Love

    Sentry integration for Flow 8.x and 9.x

    This Flow package allows you to automate reporting of errors to Sentry

    Key Features

    This package makes sure that throwables and exceptions logged in a Flow application also end up in Sentry. This is done by implementing Flow’s ThrowableStorageInterface and configuring the default implementation.

    This packages takes some extra care to clean up paths and filenames of stacktraces so you get a good overview while looking at an issue in the Sentry UI.

    Installation

    The Sentry integration is installed as a regular Flow package via Composer. For your existing project, simply include flownative/sentry into the dependencies of your Flow or Neos distribution:

    $ composer require flownative/sentry

    Configuration

    You need to at least specify a DSN to be used as a logging target. Apart from that, you can configure the Sentry environment and release. These options can either be set in the Flow settings or, more conveniently, by setting the respective environment variables:

    • SENTRY_DSN
    • SENTRY_ENVIRONMENT
    • SENTRY_RELEASE

    The package uses these environment variables by default in the settings:

    Flownative:
      Sentry:
        dsn: "%env:SENTRY_DSN%"
        environment: "%env:SENTRY_ENVIRONMENT%"
        release: "%env:SENTRY_RELEASE%"

    The error sample rate of Sentry can be set using

    Flownative:
      Sentry:
        sampleRate: 1

    The default is 1 – 100% percent of all errors are sampled.

    Throwables (that includes exceptions and runtime errors) are logged as Sentry events. You may specify a list of exceptions which should not be recorded. If such an exception is thrown, it will only be logged as a “notice”.

    Flownative:
      Sentry:
        capture:
          excludeExceptionTypes:
            - 'Neos\Flow\Mvc\Controller\Exception\InvalidControllerException'

    If an ignored exception is handled by this Sentry client, it is logged similar to the following message:

    … NOTICE Exception 12345: The exception message (Ref: 202004161706040c28ae | Sentry: ignored)
    

    Additional Data

    Exceptions declared in an application can optionally implement WithAdditionalDataInterface provided by this package. If they do, the array returned by getAdditionalData() will be visible in the “additional data” section in Sentry.

    Note that the array must only contain values of simple types, such as strings, booleans or integers.

    Testing the Client

    This package provides a command controller which allows you to log a test message and a test exception.

    Run the following command in your terminal to test your configuration:

    ./flow sentry:test
    Testing Sentry setup …
    Using the following configuration:
    +-------------+----------------------------------------------------------+
    | Option      | Value                                                    |
    +-------------+----------------------------------------------------------+
    | DSN         | https://abc123456789abcdef1234567890ab@sentry.io/1234567 |
    | Environment | development                                              |
    | Release     | dev                                                      |
    | Server Name | test_container                                           |
    | Sample Rate | 1                                                        |
    +-------------+----------------------------------------------------------+
    
    This command will now throw an exception for testing purposes.
    
    Test exception in ThrowingClass
    
      Type: Flownative\Sentry\Test\SentryClientTestException
      Code: 1662712736
      File: Data/Temporary/Development/SubContextBeach/SubContextInstance/Cache/Code/Fl
            ow_Object_Classes/Flownative_Sentry_Test_ThrowingClass.php
      Line: 41
    
    Nested exception:
    Test "previous" exception in ThrowingClass
    
      Type: RuntimeException
      Code: 1662712735
      File: Data/Temporary/Development/SubContextBeach/SubContextInstance/Cache/Code/Fl
            ow_Object_Classes/Flownative_Sentry_Test_ThrowingClass.php
      Line: 40
    
    Open Data/Logs/Exceptions/202411181211403b652e.txt for a full stack trace.
    

    There are two more test modes for message capturing and error handling:

    • ./flow sentry:test --mode message
    • ./flow sentry:test --mode error
    Visit original content creator repository https://github.com/flownative/flow-sentry
  • numerical-methods-python

    Numerical Methods in Python Actions Status

    Numerical methods implementation in Python.

    For the implementation in MATLAB, see this repository.

    Getting Started

    Prerequisites

    Using Conda (recommended)

    conda env create
    conda activate numerical-methods

    Using Pip

    pip install -r requirements.txt

    Using Ubuntu

    This section assumes Ubuntu 18.04 (also tested on Ubuntu 22.04), but the procedure is similar for other Linux distributions.

    sudo apt -y install python3-numpy

    Running the examples

    To run the main example, use:

    python3 main.py

    Implementations

    Limits

    • Epsilon-delta method

    Solutions of equations

    • Bisection method
    • Secant method
    • Regula Falsi method (False Position)
    • Pegasus method
    • Muller method
    • Newton method

    Interpolation

    • Lagrange method
    • Newton method
    • Gregory-Newton method
    • Neville method

    Algorithms for polynomials

    • Briot-Ruffini method
    • Newton’s Divided-Difference method
    • Limits of the real roots

    Numerical differentiation

    • Backward-difference method
    • Three-Point method
    • Five-Point method

    Numerical integration

    • Composite Trapezoidal method
    • Composite 1/3 Simpson’s method
    • Romberg method

    Initial-value problems for ordinary differential equations

    • Euler’s method
    • Taylor’s (Order Two) method
    • Taylor’s (Order Four) method
    • Runge-Kutta (Order Four) method

    Systems of differential equations

    • Runge-Kutta (Order Four) method

    Methods for Linear Systems

    • Gaussian Elimination
    • Backward Substitution
    • Forward Substitution

    Iterative Methods for Linear Systems

    • Jacobi method
    • Gauss-Seidel method
    Visit original content creator repository https://github.com/cfgnunes/numerical-methods-python