NISAN, Noam; SCHOCKEN, Shimon., The Elements of Computing Systems, ª ed., MIT Press, 2005, ISBN 417582 Livro Impresso
TOCCI, R. J.; WIDMER, N. S.; MOSS, G. L., Sistemas Digitais: Princípios e Aplicações, 11ª ed., Pearson, 2011, ISBN 42579 Livro Impresso
PATTERSON, D.; HENNESSY, J. L., Organização e Projeto de Computadores: A Interface Hardware/Software., 4ª ed., Campus, 2014, ISBN 58741536 Livro Impresso
This codebase was created to demonstrate a backend application built with Java 11 + Spring Boot 3 including CRUD operations, authentication, routing and more.
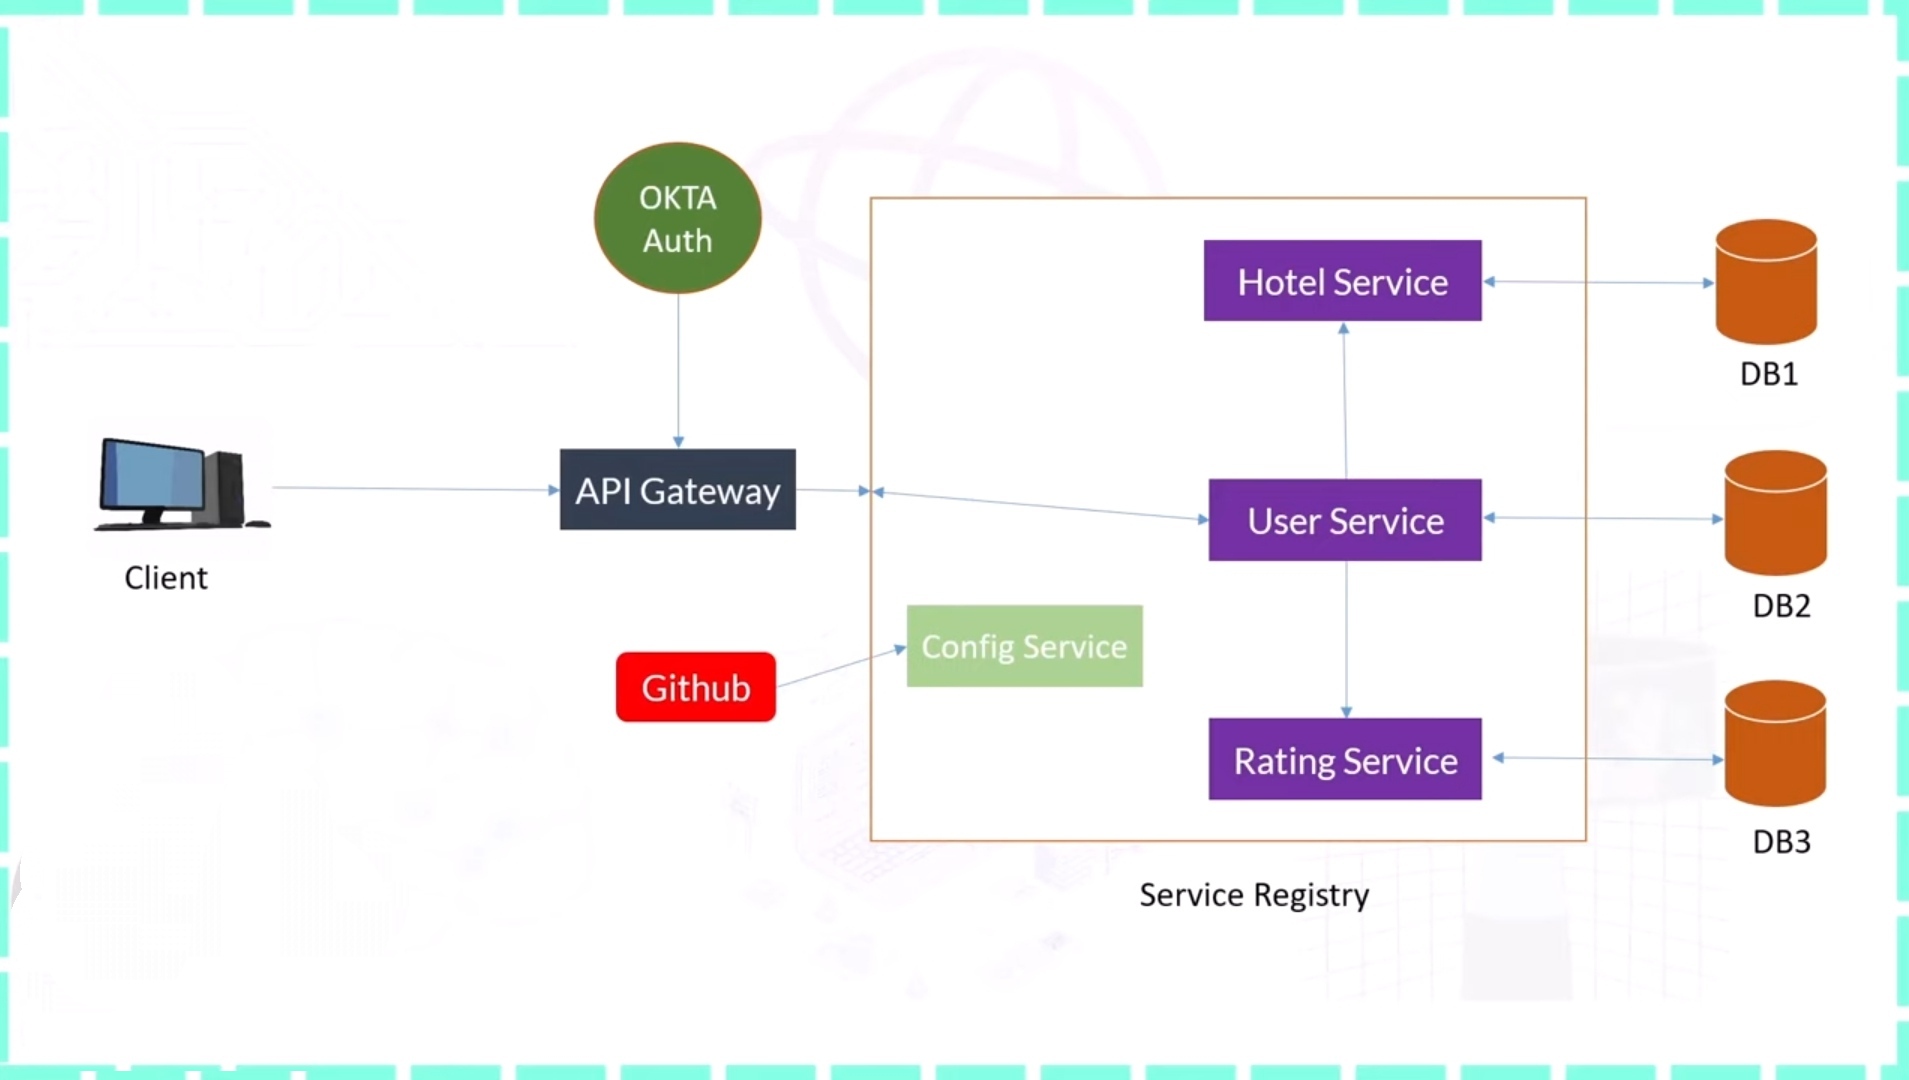
This app helps users to rate a hotel services based on their experience. Once user is logged with correct email and password, he can post and see the reviews given by other users.
This app mainly contains 3 microservices-
UserServices: This service contains information about the user like his id, name and email.It uses MySQL as a database.
HotelServices: This service contains information about the hotel like his id, name, ratings given by users and feedback provided.It uses Oracle as a database.
RatingServices: This service provides ratings given to hotels based on userID and hotelId .It uses MongoDB as a database.
Apart from these services, Okta has been used to provide security to microservices.
Taking a closer look at the project structure, the main code of the application is located in the src/main/java directory. Additionally, configuration files and such can be found in the src/main/resources directory.
The core logic of the application is organized as follows:
~Controller: Processes HTTP requests, calls business logic, and generates responses.
~Service: Implements business logic and interacts with the database through Repositories.
~Repository: An interface for interacting with the database, implemented using Spring Data JPA.
Authentication and authorization management are implemented using Spring Security, with token-based authentication using Okta. Moreover, various features of Spring Boot are utilized to implement exception handling, logging, testing, and more.
Through this project, you can learn how to implement backend applications based on Spring and how to utilize various Spring technologies. Additionally, by implementing an application following the RealWorld specifications, it provides a basis for deciding which technology stack to choose through comparisons with various other technology stacks.
Architecture
Technologies
Spring Boot: Server side framework
JPA: Entity framework
Lombok: Provides automated getter/setters
Actuator: Application insights on the fly
Spring Security: Spring’s security
Devtools: Support Hot-Code Swapping with live browser reload
Free library for modelling and simulation of waste water treatment plants.
Library description
The package WasteWater provides a collection of 3 different
international accepted activated sludge models (ASM) of different complexity,
including models for preclarifiers and 5 different models for
the secondary settling process.
PS: SimulationTimeUnit for all models built with the WasteWater library is days [d].
The WasteWater package currently consists of the following subpackages
ASM1 – Activated Sludge Model No.1 (models 13 wastewater components and 8 biological processes)
ASM2d – Activated sludge Model No.2d (models 19 wastewater components and 21 biological processes)
ASM3 – Activated Sludge Model No.3 (models 13 wastewater components and 12 biological processes)
Icons – Icon definitions for wastewater treatment components
WasteWaterUnits – unit type definitions for use with the WasteWater library
This Modelica package is free software and the use is completely at your own risk;
it can be redistributed and/or modified under the terms of the Modelica License 1.1.
For license conditions (including the disclaimer of warranty) visit http://www.modelica.org/licenses/ModelicaLicense1.1.
Development and contribution
Original Author:
Gerald Reichl
Technische Universitaet Ilmenau
Faculty of Informatics and Automation
Department Dynamics and Simulation of ecological Systems
P.O. Box 10 05 65
98684 Ilmenau
Germany
email: gerald.reichl@tu-ilmenau.de
You may report any issues with using the Issues button.
Contributions in shape of Pull Requests are always welcome.
Magento 2 Open Source or Commerce edition is required.
Composer installation
Run the following composer command:
composer require opengento/module-document-search
Setup the module
Run the following magento command:
bin/magento setup:upgrade
If you are in production mode, do not forget to recompile and redeploy the static resources.
Features
This module aims to make documents searchable for customers in Magento 2.
Documents can be searchable if their visibility is set to search.
Documentation
You can change the full search behavior by using the collection modifier extension point.
Add you own Magento\Framework\Data\CollectionModifierInterface implementation to the modifiers list of:
WordPress starter theme with WP API components and templates, Tailwind CSS, and a modern development workflow. This WordPress theme is interesting for local testing, studies and code improvements. Please do not use this theme in production, use these themes for student purposes.
Sponsors
WP API Starter Theme is an open source project and completely free to use.
However, the amount of effort needed to maintain and develop new features and products within the ecosystem is not sustainable without proper financial backing. If you have the capability, please consider sponsoring Flaubert Dev.
Don’t forget to rename it from tailwindcss-macos-x64 to tailwindcss, if in doubt, check out more information.
Theme development
In the gulpfile.js file, modify the path of your development environment:
browserSync.init({proxy: 'http://localhost/success',// Change to your local development URLopen: true// true will automatically open the browser on port 3000});
Dev command
Log in as an Administrator on your WordPress. Use this command to watch at your php, css and js files:
yarn dev
Build command
To build the project use the command below. If you are not logged into WordPress, you will see that the css and js files have been minified:
yarn build
Theme structure
themes/wp-api-starter-theme/
├── app/
│   ├── AcfJson/ # -> https://www.advancedcustomfields.com/resources/local-json/
│   └── Templates/
├── config/
├── resources/
│   ├── fonts/
│   ├── images/
│   ├── scripts/
│   └── styles/
├── templates/
├── vendor/
├── .gitattributes
├── .gitignore
├── 404.php # -> Wait... News will come in this file
├── archive.php
├── category.php
├── composer.json
├── footer.php
├── functions.php
├── gulpfile.js
├── header.php
├── index.php
├── LICENSE
├── package.json
├── page.php # -> Wait... News will come in this file
├── README.md
├── readme.txt
├── screenshot.png
├── search.php # -> Wait... News will come in this file
├── single.php # -> Wait... News will come in this file
├── style.css
├── style.min.css
├── tailwind.config.js
├── tailwindcss.exe # -> https://github.com/tailwindlabs/tailwindcss/releases/tag/v3.3.3
├── template-wp-api-example-using-JS.php
└── template-wp-query-example-using-PHP.php
This is a collection of scripts created with the purpose of simplifying the complex and difficult task for beginners of install and setting up the AviUtl main body and several essential plugins for video editing using AviUtl, so that it can be done by executing just one file.
To make it easier to run in many environments, it is in .cmd (batchfile) format, but the contents are mostly Windows PowerShell (5.x) scripts.
Operating Environment
Windows 10 April 2018 Update (version 1803) or later
(In other words, it works on all supported consumer Windows as of 2025)
How to Use
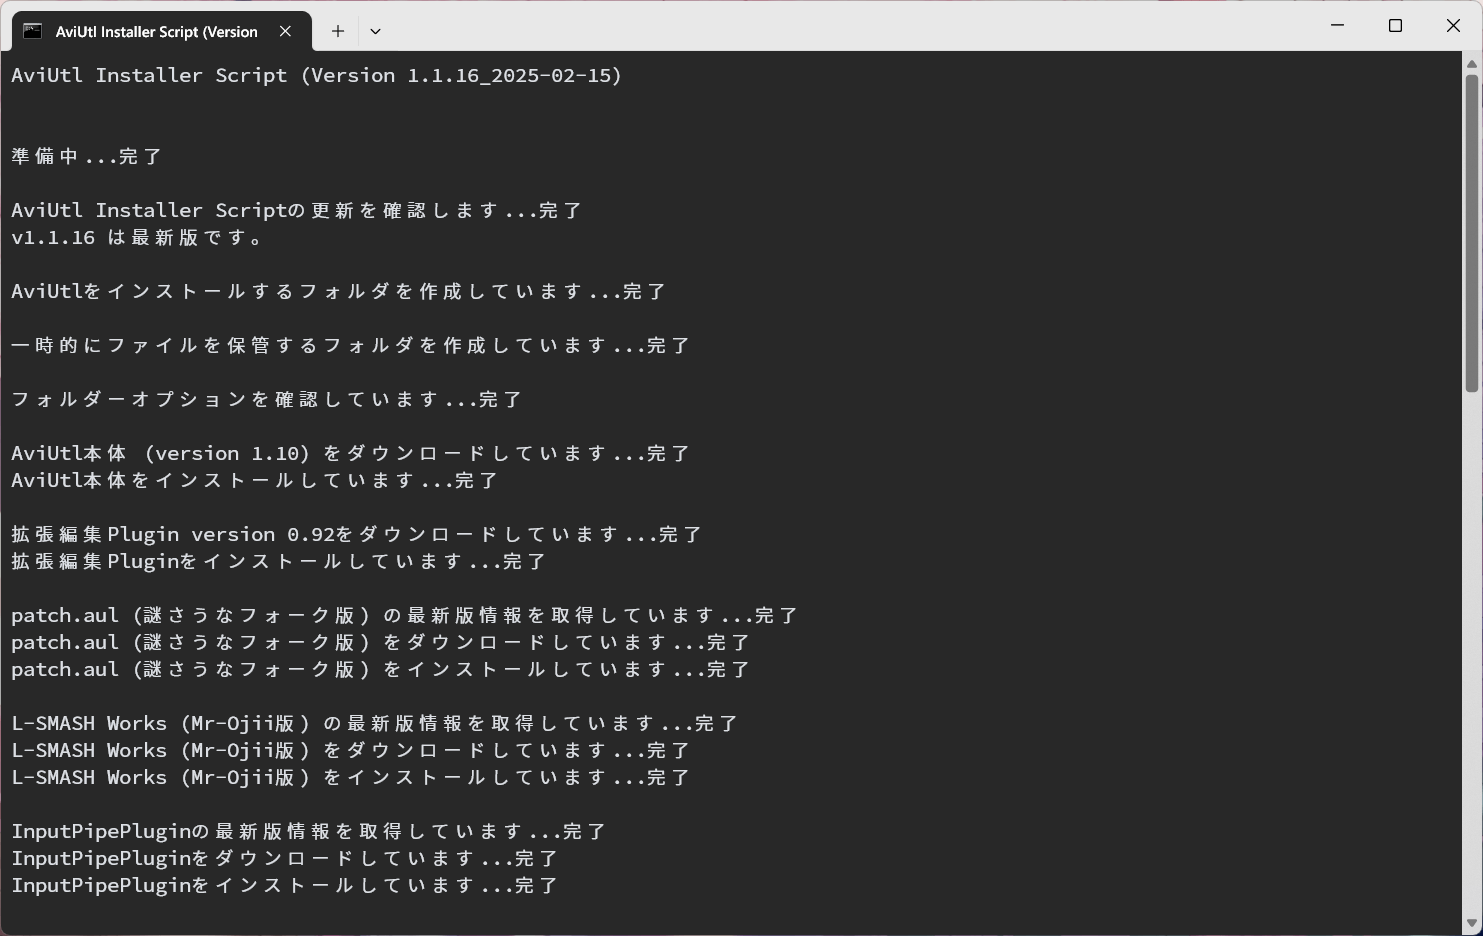
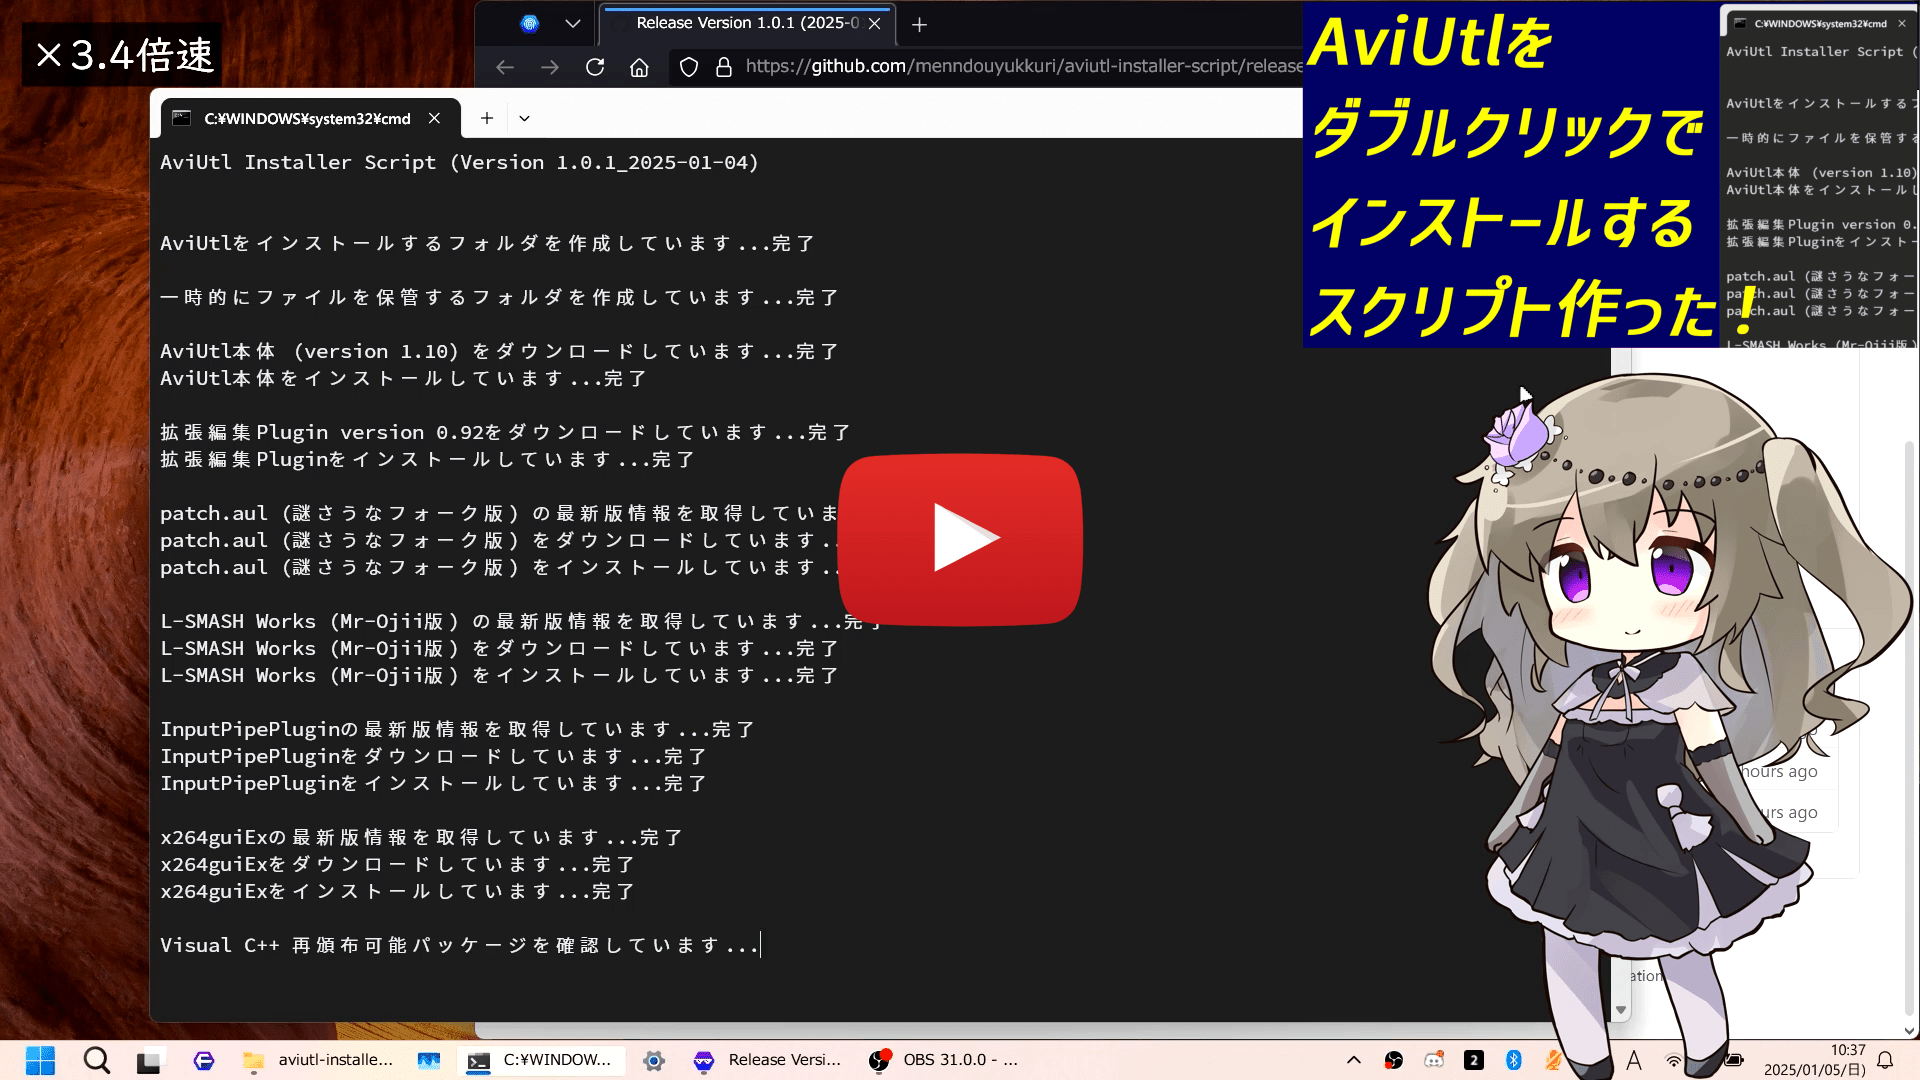
Download aviutl-installer_X.X.X.zip from the Assets of releases/latest and extract it.
After that, simply double-click on aviutl-installer.cmd to start the installation of AviUtl and the required plugins (specific details on what will be installed can be found in List of items install (ja) ).
If a screen saying “Windows protected your PC” appears, you can click More info and then click [Run anyway] to execute the script.
State of operation:
YouTube introduction video (Japanese language only):
Software with this license can be used by anyone for free and without limitation, for any purpose.
Regardless of whether modifications are made, when redistributing, the copyright notice and the MIT License must be included in all substantial parts of the software.
The provider assumes no responsibility whatsoever. Use is at your own risk.
This is the general idea of the license.
This explanation is not a legally accurate statement, so if you have any doubts, please read the full text of the MIT License.
However, please remember that just because you write it does not mean it will be resolved immediately, and that the developers are also human and deserve respect.
Aggressive issues will be closed without review, so if you want to resolve it, please write politely.
If you do not own an NWH Physics asset for your project, simply delete the two related scripts in the Input folder!
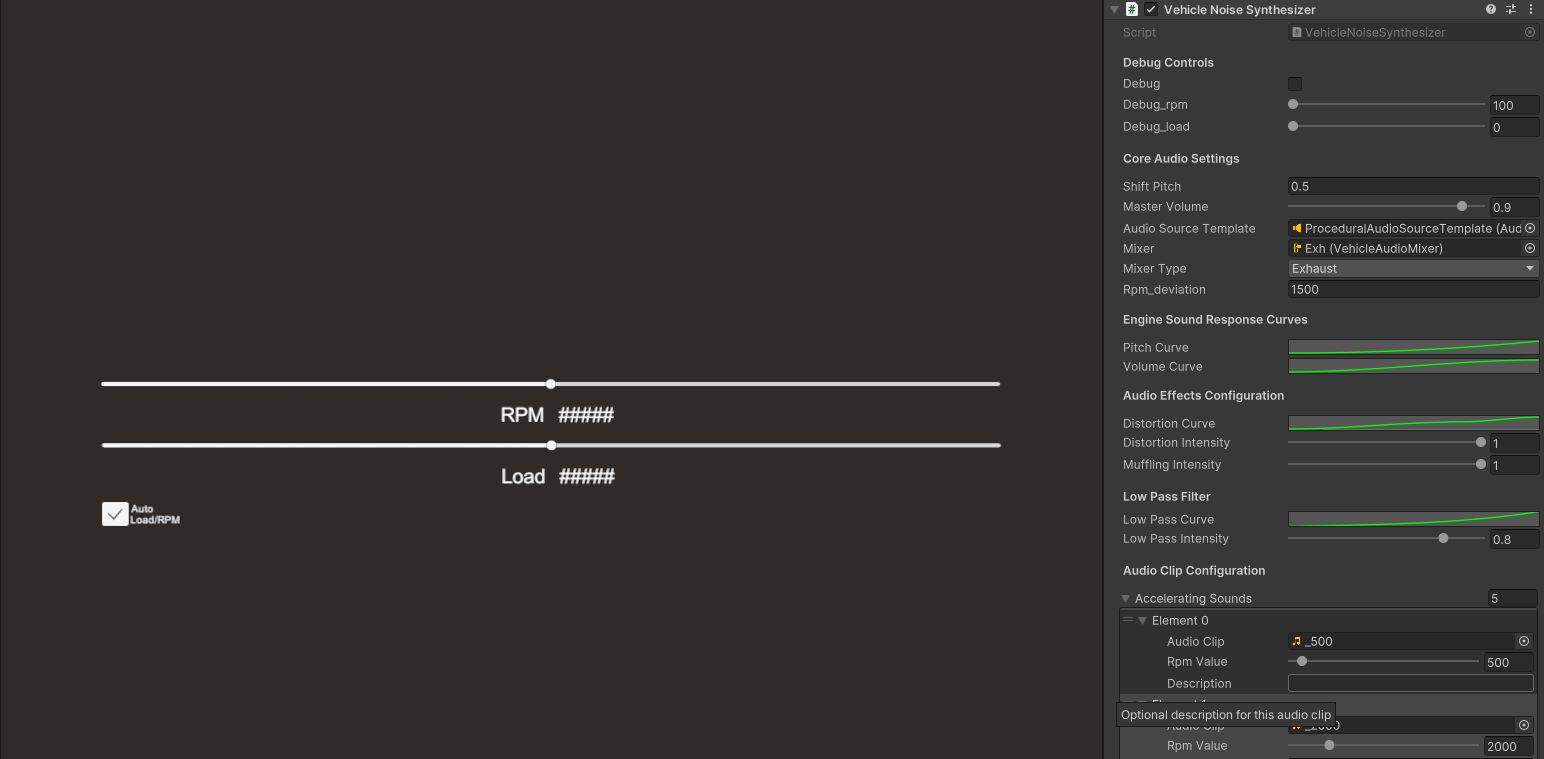
VNS is an open-source free audio addon primarily designed for Unity to simulate vehicle sounds based on engine rpm similar to a granulator without dependencies such as FMOD.
An Enhanced FM4-Inspired Vehicle Sound Synthesizer
Can be used for:
☑️ Engine
☑️ Intake
☑️ Exhausts
☑️ Transmission⁰
☑️ Differential⁰ (and alike)
ℹ️ This uses real audio clips per Engine RPM and Engine Load to create realistic sound/noise
Pros:Some of the main reasons for devising this asset:
✅ Lightweight (Async Calculations – per fixed delta time)
✅ Uses only Unity, Optionally supports Unity Audio Mixer. Thus it’s possible to build WebGL projects.
✅ Advanced additional parameters to fine-tune the audio effect.
Cons:
❌ Needs separate audio files per RPM¹
❌ Does not respect engine piston cycle frequency for fading audio clips Or in other words, it fades audio clips linearly smoothly which is not “always” good
🔁How to loop?
These are useful to compose loop audio for your vehicle sound simulation.
Here it is described how to seamlessly loop audio using a free audio tool manually:
This uses paid software to correct the pitch and make a cleaner seamless audio clip: https://youtu.be/1bnasSQbBqk
⚠️Alternatives?
Although this asset was done with the idea of using it in my passion project ATG Simulator, I would say the paid ones might be easier to work with, below is a list of assets and plugins that you can use instead of this one for your projects – the prices are valid at the time of writing this text:
Note that with DAW or standalone apps and plugins you may record looped audio clips for this (or the other assets) for simulating your audio in real-time.
ℹ️ How to use it?
Either download the unitypackage or a zipped archive of this repo. And import them into a new Unity project. Note that this asset has a pair of demo scenes that need NWH Vehicle Physics and NWH Dynamic Water Physics. To be able to use any of the two demo scenes you will need to import the said assets into your project first, then import this GitHub project. You shall have none of the NWH assets, one of them or all of them to use this asset. Just study the important codes which are commented line-by-line, And delete the scripts that are not related to your project – e.g. NWH Input demo samples if no NWH Asset is used.
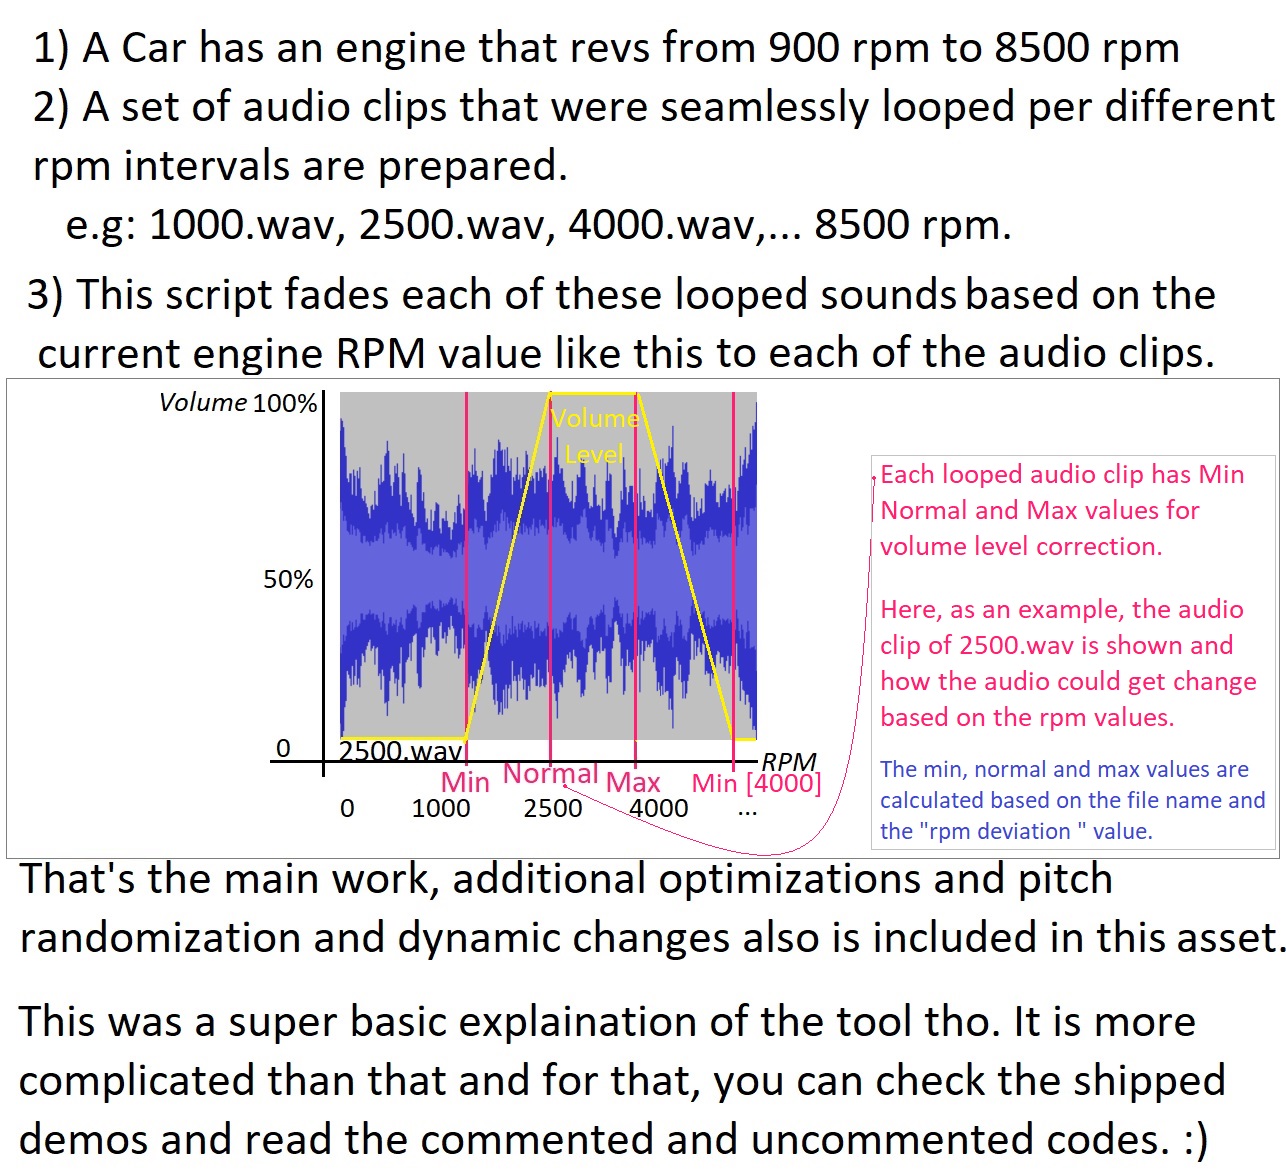
ℹ️ How does it work?
ℹ️ Why the heck am I sharing this freely?
I expect people happily use this but also improve it and share an enhanced version of it with others. Happy coding! 🙂
⁰ Transmission and differential sounds from the video are not by this script, Also blow-off and other sounds are not part of this asset as they are not intended to be.
¹ This script is also inspired by this video of the Turn10 Audio Engineer: https://youtu.be/UNvka9GL-9k. Same as Forza Horizon 3 or Forza Motorsport 7, it needs audio clips based on different rpm speeds. E.g Ferrari458Engine_Accelerating_at_the_rpm_speed_of_5000.wav and it needs at least one accelerating audio clip though very few and too many clips may result in subpar quality.
² In case you know the repository, feel free to let everyone know by adding a comment in the main GitHub repository.
For each configuration, you define your environment
...
mex.Configuration().setDescription("here you can explain the logical group you've created");
mex.Configuration().setModel("model8745.jd", "svm model based on alpha=0.05 and C=1", "2016-05-10");
mex.Configuration().setHardwareConfiguration("ubuntu", EnumProcessors.INTEL_COREI7, EnumRAM.SIZE_16GB, "SSD", EnumCaches.CACHE_3MB);
mex.Configuration().setDataSet("http://www.bmfbovespa.com.br/shared/iframe.aspx?idioma=pt-br&url=http://www.bmfbovespa.com.br/pt-br/cotacoes-historicas/FormSeriesHistoricas.asp", "bovespads", "bovespa");
mex.Configuration().setSamplingMethod(EnumSamplingMethods.CROSS_VALIDATION, 10);
mex.Configuration().setTool(EnumTools.WEKA, "3.6.6");
mex.Configuration().addFeature(newString[]{"openp", "closep", "minp", "maxp"});
...
What are your algorithms? You can also refer to them in case you need to specify different hyperparameters values
Your runs: would like to represent every single execution (EnumExecutionsType.SINGLE) or a summary for a set of executions (EnumExecutionsType.OVERALL)? Are you training (EnumPhases.TRAIN) or testing (EnumPhases.TEST)) your model?


 https://github.com/FelixLuciano/Elements-of-Computing-Systems