Blog

  • Red

    Red

    ⚠️ Code is buggy ⚠️

    1.0 Introduction:

    2.0 Implementation

    1. The birds.csv and mammals.csv contain the species for which the data has to be scrapped.

    2. The permissions of the start.sh have to be changed before the first run of the code.

       user@computer:~/Red chmod +X start.sh
      
    3. The pipeline is triggered using the start.sh script, that in-turn triggers the scraper.py code.

       user@computer:~/Red ./start.sh
      
    4. The scrapped data is stored to the disc in the form of a X_WORKING.csv file, a copy of the original .csv, ensuring the originals are not tampered with.
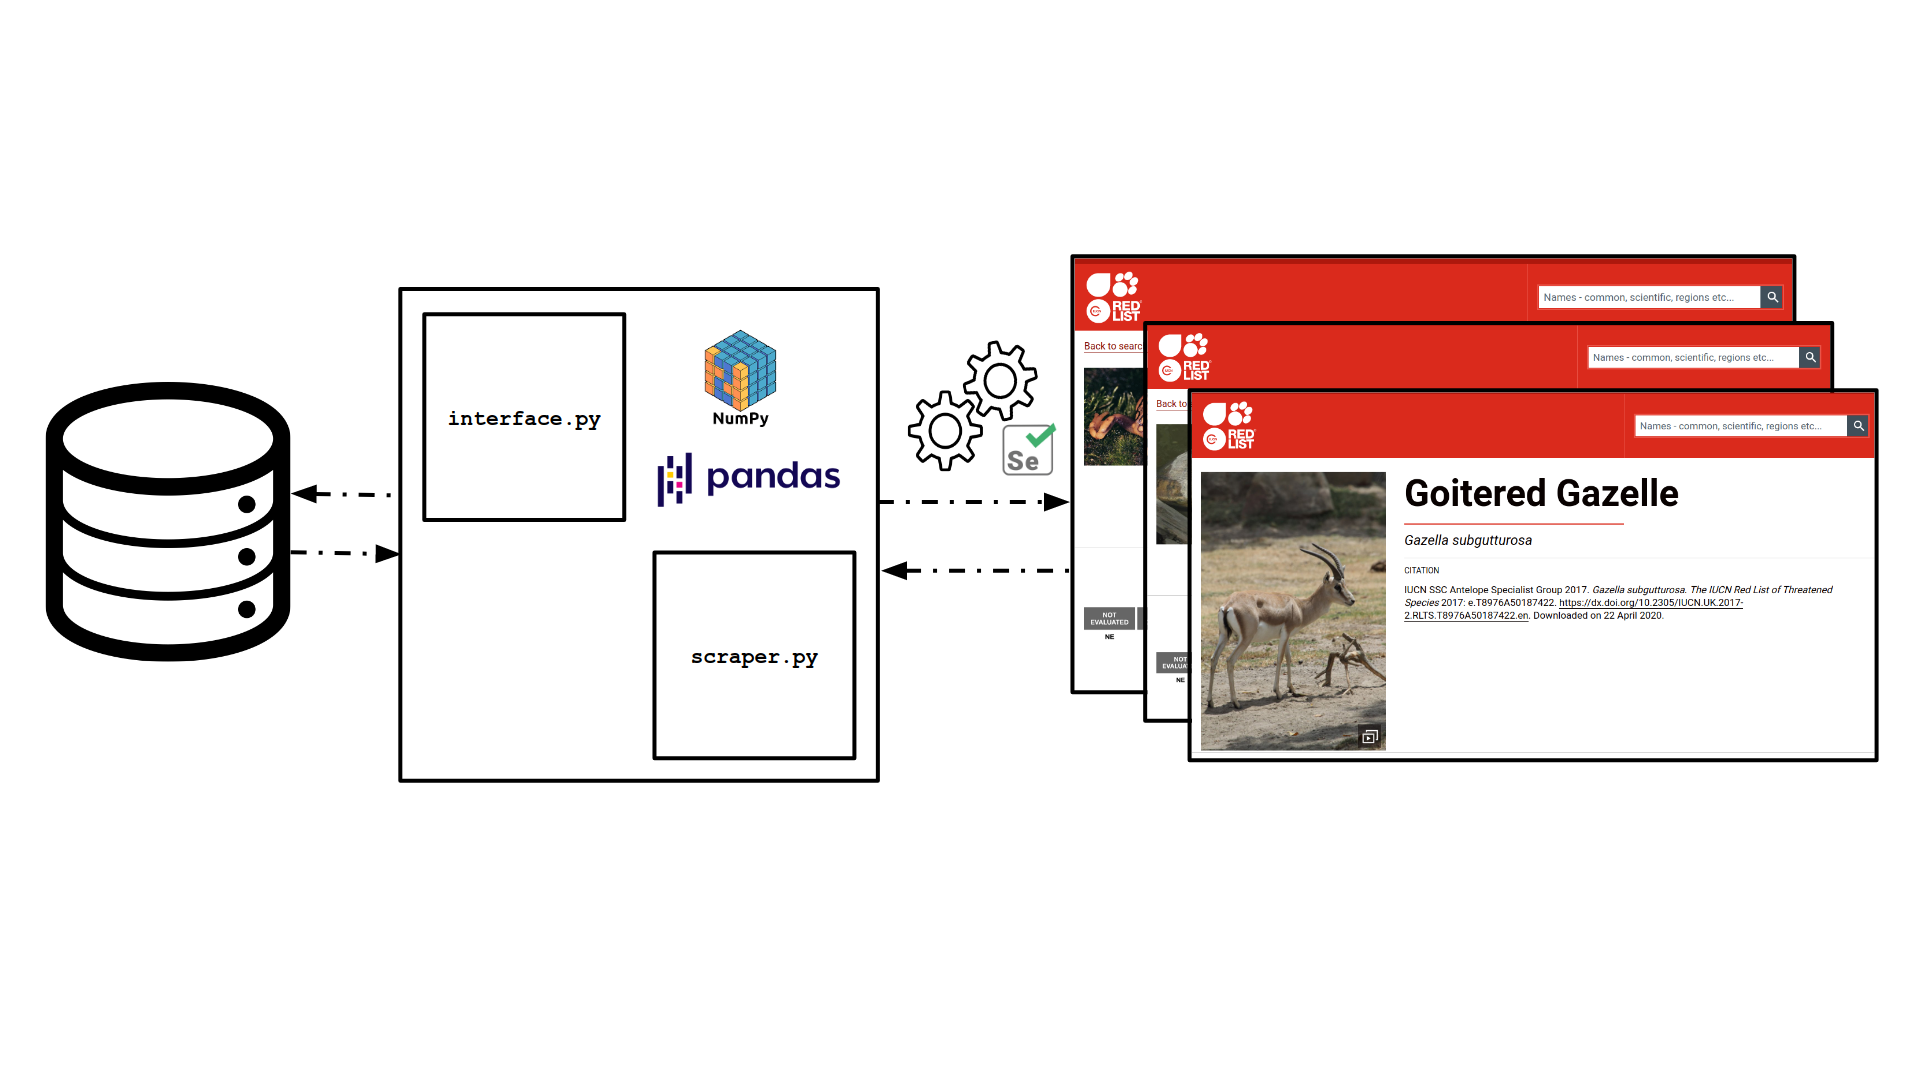
    3.0 Model Overview:

    alt text Figure 2.1 Model to scrape data from IUCN Red List

    3.1 Interface

    1. Disk write/read operations are handled by the interface.py code.

    2. The pandas dataframe is saved to the disc by the interface.py code after each run.

    3.2 Scraper

    1. The scraper.py interacts with the webpage using the Selenium framework for performance testing.

    2. The HTML tags contained in the page_source gathered by the Selenium middleware code is made searchable using BeautifulSoup

    3. The scraper.py pipeline collects the prescribed HTML tags from the website queried and updates a pandas dataframe with the information.

    4. The speciesCounter() of the scraper.py script returns the sno of the last species that’s missing the stable, unknown or decline population trend tags, which all scrapped species must have.

    4.0 Known Issues:

    1. While writing elements to the pandas dataframe an element maybe right-shifting a column(s). This error may lead to a pandas memory warning, considreing entities of multiple datatypes occupy the same column.

    2. Some species are not indexed by the IUCN Red List. This may cause the start.sh script to loop while trying to collect the species URL from the searchpage.

    Citation:

    If you decide to use our client, scraper or cleaner for your project, or as a means to interface with the IUCN database, please cite our 2021 Conservation Letters paper!

    @article{mendiratta2021mammal,
      title={Mammal and bird species ranges overlap with armed conflicts and associated conservation threats},
      author={Mendiratta, Uttara and Osuri, Anand M and Shetty, Sarthak J and Harihar, Abishek},
      journal={Conservation Letters},
      volume={14},
      number={5},
      pages={e12815},
      year={2021},
      publisher={Wiley Online Library}
    }
    
    Visit original content creator repository https://github.com/SarthakJShetty/Red
  • tl-story-inscriptions

    Transient Labs Story Inscriptions

    Developed in collaboration with Michelle Viljoen, Story Inscriptions enable new ways for artists and collectors to experience and add to their art, while creating news ways for all to experience and discover art. This is Social Art, not social media.

    1. Problem Statement

    Art has so much more to it than just the piece of art itself. There is the story of the artist, the inspiration behind the piece of art, and the story from each collector of the piece.

    There is no easy way to have all of these stories available to potential collectors and the community as a whole. Typically, it’s just verbally relayed amongst all parties.

    In crypto art, piece descriptions get us part of the way there… but we can do so much better by leveraging blockchain technology.

    2. Current State of the System

    Currently, crypto artists and their stories are relayed to collectors via Twitter, marketplace bios (which are typically short and hard to find), and art descriptions.

    Sometimes collectors will tweet about why they collected a piece, but generally these stories are hard to find unless you’ve saved the tweet somewhere.

    This space keeps talking about storytelling… but has yet to have a good way to tell these stories immutably.

    3. Story Contract Solution

    Originally developed as a collaboration with Michelle Viljoen, the Story Contract was developed to overcome the limitations of traditional storytelling.

    This contract allows both the artist and collector(s) can write their stories to the blockchain, where they are stored immutably and for infinitum, without censorship.

    Transient Labs plans to provide a new experience where people can explore stories, in general or for a specific piece of art. We are also working with marketplaces to get this integrated.

    4. Story Inscription Format

    Story Inscriptions are markdown text blobs, supporting both portions of Markdown: Frontmatter and Content.

    Frontmatter

    Frontmatter is a JSON blob, with curly braces starting and ending on their own lines (as shown below). Any structured data can be put in here. Transient Labs uses namespacing for specific products, such as T.R.A.C.E.

    JSON was chosen as it is the most secure and easiest to serialize across web frameworks. YAML is not secure enough in our opinion and TOML is harder to work with. There is no standard way to specify JSON Frontmatter, however, the method chosen here is widely supported across programming languages (Javascript, Python, Go).

    Content

    Content is markdown text that should be parsed and escaped to avoid XSS and other attack vectors. This guide shows what is accepted as Markdown syntax: https://www.markdownguide.org/basic-syntax/

    Example

    {
      "data": "some json data in Frontmatter"
    }
    # Markdown Content starts here!
    You can write whatever you want down here!

    5. ERC-165 Support

    The Story Contract supports ERC-165. The Interface ID is 0x2464f17b. The previous interface id that is supported in versions lower than 5.0.0 is 0x0d23ecb9.

    6. Gas Cost

    Based on local testing, the gas cost of a 5000 word story (a research paper) costs 255867 gas. At 100 gwei gas, this coverts to a gas cost of 0.0255867 ETH. This is extrememly gas efficient compared to other methods. Stories will also likely be much shorter in length and submitted when gas is lower.

    Testing

    You should run the test suite with the Makefile.

    This loops through the following solidity versions:

    • 0.8.20
    • 0.8.21
    • 0.8.22

    Any untested Solidity versions are NOT reccomended for use.

    Disclaimer

    This codebase is provided on an “as is” and “as available” basis.

    We do not give any warranties and will not be liable for any loss incurred through any use of this codebase.

    License

    This code is copyright Transient Labs, Inc 2023 and is licensed under the MIT license.

    Visit original content creator repository
    https://github.com/Transient-Labs/tl-story-inscriptions

  • AvrTracing

    Available as Arduino library “AvrTracing”

    License: GPL v3 Installation instructions Commits since latest Build Status Hit Counter

    A small (344 bytes) Arduino library to have real program traces and to find the place where your program hangs.
    Trace your program by pressing a button connected at pin 2 or use startTracing() and stopTracing() to trace selected parts of your code. startTracing() sets pin 2 to LOW!
    Currently only running on ATmega type processors like on the Arduino Uno, Nano, or Leonardo boards.

    Timing

    With tracing enabled and 115200 baud, 11 characters “PC=0x…\r\n” are sent each time, lasting around 1 millisecond. So the effective CPU frequency is around 1 kHz i.e. 16,000 times slower. for 1 cycle commands. 2 or 3 cycle commands require the same time, so the effective CPU frequency is 2 or 3 kHz respectively.
    E.g. delayMicroseconds(1000) is slowed down by the factor of 7500 and lasts 7.5 seconds.
    Interrupt service routines cannot be traced by this library. This results in millis() and micros() are slow, but they tell the real time. Thus delay() only takes 48 times the original value.

    Disclaimer

    I observed, that Wire will hang if traced and no timeout is specified with Wire.setWireTimeout(). In general, functions depending on timing may not work or behave strange if traced.

    Usage

    #include "AvrTracing.hpp"
    
    setup() {
        Serial.begin(115200);
        initTrace();
        // optional info output
        printTextSectionAddresses();
        printNumberOfPushesForISR();
        startTracing();
        // the code to trace
        ...
        stopTracing();
    }
    

    Resulting output

    Start of text section=0x184 end=0xABE
    Found 17 pushes in ISR
    ...
    PC=0x01D0
    PC=0x01D2
    PC=0x01D4
    PC=0x01D6
    PC=0x01D8
    PC=0x01DA
    PC=0x01DC
    PC=0x01DE
    PC=0x01E0
    

    Trace only part of your program

        ...
        startTracing();
        _NOP();
        _NOP(); // Both nop's are not printed, but they allow to see the program counter of the call instructions of digitalWrite().
        digitalWrite(LED_BUILTIN, HIGH); // Takes 24 ms for 27 prints.
        stopTracing(); // the first 2 instructions of stopTracing() are printed at last.
        digitalWrite(LED_BUILTIN, LOW);
        ...

    Generating the assembler file

    In order to match PC values to your code, you require the assembler (*.lss) file to be generated.
    This assembler file can be generated with avr-objdump --section-headers --source --line-numbers <myfilename>.elf > <myfilename>.lss.

    Arduino IDE

    You have to extend the platform.txt file. On my PC it is located at C:\Program Files\arduino-1.8.16\hardware\arduino\avr or C:\Users\<Username>\AppData\Local\Arduino15\packages\arduino\hardware\avr\1.8.3.
    Insert the following line after the ## Save hex block.

    recipe.hooks.objcopy.postobjcopy.1.pattern.windows=cmd /C "{compiler.path}avr-objdump" --disassemble --source --line-numbers --demangle --section=.text "{build.path}/{build.project_name}.elf" > "{build.path}/{build.project_name}.lss"
    

    The path of the resulting *.lss assembler file is like C:\Users\<Username>\AppData\Local\Temp\arduino_build_\. The path is printed in the Arduino console if you check show verbose output during compilations in the File/Arduino/Preferences settings.
    The ATTinyCore board package still generates this assembler file as a *.lst file.

    Insert avr-objdump -h -S ${BuildArtifactFileBaseName}.elf > ${BuildArtifactFileBaseName}.lss in Project/Properties/C/C++ Build/Settings/Build Steps/Post-build steps/Command.
    Examples for such a project configuration can be found here.

    AVR Eclipse Plugin

    For the AVR Eclipse Plugin (de.innot.avreclipse.p2repository-2.4.2.zip), check the Create Extended Listing option in Project/Properties/C/C++ Build/Settings/Additional Tools in toolchain and insert -g in Project/Properties/C/C++ Build/Settings/Linker/General/Other Arguments.

    Hint for assembler creation

    Sometimes the assembler output is easier to understand, if you disable the compiler optimization. For this, in the the platform.txt file, change all occurences of -Os to -Og and remove all occurences of -flto. This also increases the code size and therefore might not be applicable for large programs, they may not fit into the program memory any more.

    TraceBasic example

    Program output Generated assembler from .lss file
    START ../src/TraceBasic.cpp from Oct 28 2021
    Using library version 1.0.0
    Low level on PCI0 (pin2) will print program counter
    PC=0x2B4
    PC=0x776
    PC=0x778
    PC=0x77A
    Startup code and start of loop
    PC=0x1EA
    PC=0x1EC
    PC=0x1EE
    PC=0x1F0
    PC=0x1F2
    Loop content
    void loop() { // 11 clock cycles // 687,5 ns
        digitalWriteFast(TEST_OUT_PIN, HIGH); // 2 clock cycles / 125 ns 15 ms with trace
     1ea:   5c 9a           sbi 0x0b, 4 ; 11
        digitalWriteFast(TEST_OUT_PIN, LOW); // 2 clock cycles / 125 ns 15 ms with trace
     1ec:   5c 98           cbi 0x0b, 4 ; 11
        digitalWriteFast(TEST_OUT_PIN, HIGH);
     1ee:   5c 9a           sbi 0x0b, 4 ; 11
        digitalWriteFast(TEST_OUT_PIN, LOW);
     1f0:   5c 98           cbi 0x0b, 4 ; 11
    }
     1f2:   08 95           ret
    PC=0x77C
    PC=0x77E
    PC=0x780
    1. part of Arduino internal loop
        for (;;) {
            loop();
     77a:   37 dd           rcall   .-1426      ; 0x1ea 
            if (serialEventRun) serialEventRun();
     77c:   20 97           sbiw    r28, 0x00   ; 0
     77e:   e9 f3           breq    .-6         ; 0x77a 
     780:   fc dd           rcall   .-1032      ; 0x37a <_Z14serialEventRunv>
     782:   fb cf           rjmp    .-10        ; 0x77a 
    PC=0x37A
    PC=0x37C
    PC=0x37E
    PC=0x380
    PC=0x382
    PC=0x384
    PC=0x386
    PC=0x388
    PC=0x392
    The called serialEventRun() function
    void serialEventRun(void)
    {
    #if defined(HAVE_HWSERIAL0)
      if (Serial0_available && serialEvent && Serial0_available()) serialEvent();
     37a:   8e e0           ldi r24, 0x0E   ; 14
     37c:   93 e0           ldi r25, 0x03   ; 3
     37e:   89 2b           or  r24, r25
     380:   41 f0           breq    .+16        ; 0x392 <_Z14serialEventRunv+0x18>
     382:   80 e0           ldi r24, 0x00   ; 0
     384:   90 e0           ldi r25, 0x00   ; 0
     386:   89 2b           or  r24, r25
     388:   21 f0           breq    .+8         ; 0x392 <_Z14serialEventRunv+0x18>
     38a:   48 d1           rcall   .+656       ; 0x61c <_Z17Serial0_availablev>
     38c:   81 11           cpse    r24, r1
     38e:   0c 94 00 00     jmp 0   ; 0x0 <__vectors>
      if (Serial2_available && serialEvent2 && Serial2_available()) serialEvent2();
    #endif
    #if defined(HAVE_HWSERIAL3)
      if (Serial3_available && serialEvent3 && Serial3_available()) serialEvent3();
    #endif
    }
     392:   08 95           ret
    PC=0x782
    PC=0x77A
    2. part of Arduino internal loop
    PC=0x1EA
    PC=0x1EC
    PC=0x1EE
    2. run of loop content

    Other tracing methods

    Besides of using Serial.print() statements, there is an extension of the simple print method, the ArduinoTrace library. But be aware, that the calls and especially the strings used by this methods require a lot of program memory.

    Program memory size

    If NUMBER_OF_PUSH is defined (static mode): 284 bytes
    If NUMBER_OF_PUSH is not defined (recommended dynamic mode): 344 bytes (60 bytes more than static)

    You can first use the dynamic mode without DEBUG_INIT defined, and call printNumberOfPushesForISR() to get the right number of pushes and then switch to static mode using this value, to save around 60 bytes of program memory or to proof, that you have counted the pushes of the ISR correct :-).

    Compile options / macros for this library

    If you coomment out the line #define DEBUG_INIT you see internal information at the call of initTrace(). This costs 52 (static) / 196 (dynamic) bytes of program memory.

    Related links

    https://github.com/jdolinay/avr_debug https://hinterm-ziel.de/index.php/2021/07/19/debugging3-debugging-is-like-being-the-detective-in-a-crime-movie-where-you-are-also-the-murderer

    If you find this library useful, please give it a star.

    Revision History

    Version 1.0.1

    • Keep -Os for the library.

    Version 1.0.0

    Initial Arduino library version.

    Visit original content creator repository https://github.com/ArminJo/AvrTracing
  • vote

    vote DroneCI Coverage Status Libraries.io dependency status for GitHub repo GitHub

    Digital voting system for Abakus’ general assembly

    vote

    Setup

    vote assumes you have a MongoDB-server running on mongodb://localhost:27017/vote and a redis-server running as localhost:6379. To change the URL, export MONGO_URL and REDIS_URL as an environment variable.

    # Start MongoDB and Redis, both required for development and production
    $ docker-compose up -d
    # Install all dependencies
    $ yarn
    $ yarn dev # terminal 1, backend and old frontend
    $ yarn dev:client # terminal 2, new frontend

    Usage

    The following docs outline the technical usage, if you’ve got someone else to set it up for you and are looking for how to interact with the GUI, check out HOWTO.md (in norwegian).

    Users

    Initially you will need to create a moderator and or admin user in order to login

    # Create a user via the CLI. You are prompted to select usertype.
    $ ./bin/users create-user <username> <cardKey>

    Card-readers

    vote uses a RFID-reader to register and activate/deactivate users. This is done to make sure that only people that are at the location can vote. The RFID-reader needs to be connected to the computer that is logged in to the moderator panel. See section about using the card reader further down this readme.

    Development

    Check docs for the environment variable ETHEREAL if you intend to develop email related features

    $ yarn start

    Environment variables

    • MONGO_URL
      • Url to the database connection
      • default: mongodb://0.0.0.0:27017/vote
    • REDIS_URL
      • Hostname of the redis server
      • default: localhost
    • ICON_SRC (optional)
      • Url to the main icon on all pages
      • default: /static/images/Abakule.jpg
    • COOKIE_SECRET
      • IMPORTANT to change this to a secret value in production!!
      • default: in dev: localsecret, otherwise empty
    • FRONTEND_URL
      • The site where vote should run
      • defualt: http://localhost:3000
    • FROM
      • The name we send mail from
      • default: Abakus
    • FROM_MAIL
      • The email we send mail from
      • default: admin@abakus.no
    • SMTP_URL
      • An SMTP connection string of the form smtps://username:password@smtp.example.com/?pool=true
    • GOOGLE_AUTH
      • A base64 encoded string with the json data of a service account that can send mail.
    • NODE_ENV
      • Node environment. development, test or production

    See app.js and env.js for the rest

    Production

    For a production deployment example, see deployment in the deployment folder

    $ yarn build
    $ ICON_SRC=https://some-domain/image.png NODE_ENV=production GOOGLE_AUTH=base64encoding yarn start

    Using the card-readers

    Make sure you have enabled Experimental Web Platform features and are using Google Chrome. Experimental features can be enabled by navigating to: chrome://flags/#enable-experimental-web-platform-features. Please check that the USB card reader is connected. When prompted for permissions, please select the card reader (CP210x).

    Serial permissions (Linux)

    When using the card readers on a linux based system there can be permission problems with google-chrome. Chrome needs access to the ports, and often the ports are controlled by another group, so chrome cannot use them. Therefore you must do one of the following:

    1. Run google-chrome as root

    NOTE: This has stopped working on modern versions of ubuntu-based distros, most likely due to the use of flatpak.

    $ sudo google-chrome

    OR

    1. Add your user to the dialout group.
      • Check what group the tty(USBPORT) is:
      $ ls -al /dev/ttyUSB* | cut -d ' ' -f 2`
      
      • Check what groups your user is added to:
      $ groups
      • Normally the tty is in the dialout group, so add your user to that group with:
      $ sudo usrmod -a -G dialout $USER

    You need to sign in and out to get the new privileges!

    Tests

    vote uses vitest for backend cypress for the frontent tests. To run them all you can do:

    # Frontend (headless) and backend
    $ yarn test
    # Frontend with gui
    $ yarn test:frontend

    Vote Occasion

    We have a list of every occasion vote has been used. If you or your organization use vote for your event we would love if you made a PR where you append your event to the list.

    The list is located at ./usage.yml. Just create a new entry at the bottom. Then run yarn lint to see if your YAML is correct.


    MIT © webkom, Abakus Linjeforening

    Visit original content creator repository https://github.com/webkom/vote
  • StarCitizen-Localization

    StarCitizen-Localization 🌎

    Discord GitHub all releases GitHub Workflow Status (with event)

    Versions:

    Languages:

    Table of Contents:


    Supported Languages

    Language Supported Source
    English Static Badge Imported from game files
    French – France Static Badge Generated from circuspes.fr
    German – Germany Static Badge Here
    Portuguese – Brazil Static Badge Here
    Italian – Italy Static Badge GattoMatto and MrRevo
    Spanish – Spain Static Badge Here
    Spanish – Latin America Static Badge Awaiting contribution
    Chinese – Simplified Static Badge Awaiting contribution
    Chinese – Traditional Static Badge Awaiting contribution
    Japanese – Japan Static Badge Awaiting contribution
    Korean – South Korea Static Badge Awaiting contribution
    Polish – Poland Static Badge Awaiting contribution

    Installation Guide

    Easiest Installation Method (PowerShell)

    Just copy and paste this single command into PowerShell to automatically install Star Citizen translations:

    powershell -ExecutionPolicy Bypass -Command "iex (irm https://raw.githubusercontent.com/Dymerz/StarCitizen-Localization/main/tools/install_localization.ps1)"

    Simple Steps:

    1. Press Win+X and select “Windows PowerShell” or “Terminal”
    2. Copy the command above
    3. Paste into PowerShell and press Enter
    4. Follow the on-screen prompts to select your language

    Automatic Installation (Alternative)

    1. Download the install_localization.ps1 script.
    2. Right-click on the downloaded file (install_localization.ps1) and select Run with PowerShell.
    3. Follow the instructions, and the script will automatically download the latest localization files, install them in the Localization folder, and configure the user.cfg file.
    4. Launch the game and enjoy the translation!

    Note: If you encounter an execution policy error:

    • Open the folder where the install_localization.ps1 script is saved, right-click in the folder, and select Open in PowerShell.
    • Run the following command to bypass the execution policy:
      PowerShell -ExecutionPolicy Bypass -File "./install_localization.ps1"
      This is needed because Windows may prevent scripts from running due to security settings.

    Alternative Option: Use the install_localization.cmd script:

    • Ensure a data folder exists in your game directory (e.g., C:\Program Files\Roberts Space Industries\StarCitizen\LIVE\data\).
    • Place install_localization.cmd into the data folder and double-click to run it.

    Manual Installation

    1. Download the Localization.zip file.
    2. Extract the files to \StarCitizen\LIVE\data\ (e.g., C:\Program Files\Roberts Space Industries\StarCitizen\LIVE\data\).
    3. Create/edit \StarCitizen\LIVE\user.cfg (e.g., C:\Program Files\Roberts Space Industries\StarCitizen\LIVE\user.cfg).
    4. Add the language line to user.cfg:
    Language Configuration
    English g_language = english
    French – France g_language = french_(france)
    German – Germany g_language = german_(germany)
    Portuguese – Brazil g_language = portuguese_(brazil)
    Italian – Italy g_language = italian_(italy)
    Spanish – Spain g_language = spanish_(spain)
    Spanish – Latin America g_language = spanish_(latin_america)
    Chinese – Simplified g_language = chinese_(simplified)
    Chinese – Traditional g_language = chinese_(traditional)
    Japanese – Japan g_language = japanese_(japan)
    Korean – South Korea g_language = korean_(south_korea)
    Polish – Poland g_language = polish_(poland)
    1. Always add audio language english:
      g_languageAudio = english
      
    2. Save the user.cfg file, and launch the game. 🚀

    Example user.cfg File:

    g_language = french_(france)
    g_languageAudio = english
    

    Updating the Localization Files

    To update the localization files, please follow the Installation Guide again.


    Contributing

    See CONTRIBUTING.md


    Contributors

    ROBdk97
    ROBdk97

    🌍 📆
    Autovot
    Autovot

    🌍
    electronicfreak
    electronicfreak

    🌍
    Jack
    Jack

    🌍 📆
    Auhrus
    Auhrus

    🌍 📆
    Nxzzin
    Nxzzin

    🌍
    InterPlay
    InterPlay

    🌍
    Manu
    Manu

    👀
    Daniel Martin (dmartin-webimpacto)
    Daniel Martin (dmartin-webimpacto)

    🌍
    xGattoMattox
    xGattoMattox

    🌍

    Analytics

    Alt


    Disclaimer

    This is an unofficial Star Citizen fansite, not affiliated with the Cloud Imperium group of companies. All content on this site not authored by its host or users are property of their respective owners. Star Citizen®, Roberts Space Industries® and Cloud Imperium® are registered trademarks of Cloud Imperium Rights LLC

    Visit original content creator repository https://github.com/Dymerz/StarCitizen-Localization
  • agones-broadcaster-http

    Build Status

    Agones Broadcaster HTTP

    Expose Agones GameServers information via HTTP

    This project leverages the https://github.com/Octops/agones-event-broadcaster and exposes details about GameServers running within the cluster via an HTTP endpoint.

    All the information from the GameServers returned from the Agones Event Broadcaster is kept in memory only. There is no persistent storage available.

    Considerations:

    • It is not possible to recover information from the GameServers if the service is not up and running
    • Every time the service starts it will re-sync the in-memory cache from scratch
    • If the state of a GameServer changes due to any circumstances, the broadcaster will update the cached info in nearly realtime
    • The service can’t be used for updating data

    Important

    Only information from GameServers in a Scheduled, Ready or Allocated state will be returned.

    The service returns json data in a non specific order. An example is shown below.

    {
       "gameservers":[
          {
             "name":"simple-udp-agones-1",
             "namespace":"default",
             "labels":{
                "version":"v1"
             },
             "addr":"172.17.0.2",
             "port":7412,
             "state":"Ready",
             "node_name":"node-us-central1-pool-172-17-0-2",
             "players": {
                 "capacity": 10,
                 "count": 2
             }
          },
          {
             "name":"simple-udp-agones-2",
             "namespace":"default",
             "labels":{
                "version":"v1"
             },
             "addr":"172.17.0.2",
             "port":7080,
             "state":"Ready",
             "node_name":"node-us-central1-pool-172-17-0-2",
             "players": {
                 "capacity": 10,
                 "count": 0
             }
          },
          {
             "name":"simple-udp-agones-3",
             "namespace":"default",
             "labels":{
                "version":"v1"
             },
             "addr":"172.17.0.2",
             "port":7611,
             "state":"Ready",
             "node_name":"node-us-central1-pool-172-17-0-2",
             "players": {
                 "capacity": 10,
                 "count": 9
             }        
          }
       ]
    }

    Install

    The command below will push the install.yaml manifest and deploy the required resources.

    # Everything will be deployed in the `default` namespace.
    $ make install

    Alternatively, you can deploy the service in a difference namespace

    $ kubectl create ns NAMESPACE_NAME
    $ kubectl -n [NAMESPACE_NAME] apply -f install/install.yaml

    Fetch Data

    Port-Forward

    Use Kubernetes port-forward mechanism to access the service’s endpoint running withing the cluster from your local environment.

    # Terminal session #1
    $ kubectl [-n NAMESPACE_NAME] port-forward svc/octops-broadcaster-http 8000
    
    # Terminal session #2
    $ curl localhost:8000/api/gameservers

    In-Cluster

    The service’s endpoint will be available to other services running within the cluster using the internal DNS name octops-broadcaster-http.default.svc.cluster.local.

    External World

    The current install manifest does not expose the service to the external world using Load Balancers or the Ingress Controller.

    Check the Kubernetes documentation for more details about Connecting Applications with Services.

    Clean up

    $ kubectl [-n NAMESPACE_NAME] delete -f install/install.yaml
    Visit original content creator repository https://github.com/Octops/agones-broadcaster-http
  • Chile-Proxies

    Bright Data’s Chile Proxies

    Promo

    Overview

    Experience seamless scraping with Bright Data’s Chile proxies, designed to provide precise targeting, unmatched stability, and rapid response times. Start scraping websites from Chile and don’t get blocked again.

    • 541,100K Chile proxy IPs
    • Sticky and rotating sessions
    • 99.95% success rate
    • HTTP(S) & SOCKS5 support
    • City, state, ZIP code level targeting (Free)

    Key Features

    • High Success Rates: Achieve up to 99.95% success in your scraping projects.
    • Fast Response: Average response time of ~0.7 seconds.
    • Ethically Sourced: All proxies are sourced with explicit user consent.
    • Unlimited Concurrent Sessions: Scale your operations without limitations.

    Types of Chile Proxies

    Residential proxies – Enjoy effortless scraping with the fastest residential proxies in the industry. Take advantage of accurate targeting and unparalleled reliability.

    • HTTP(S)/ & SOCKS5 supported
    • Global customer support

    Datacenter proxies – Effortlessly scale anonymous data collection using the fastest and most dependable datacenter IP pool.

    • 0.24s resonse time
    • Pay-Per-IP or bandwidth usage

    ISP proxies – Highest quality static residential proxies that you can keep for life.

    • Pay-per-IP or by bandwidth usage
    • Fastest response time in the industry

    Mobile proxies – View the web as real mobile users do with mobile IPs from around the globe.

    • 3G/4G/5G mobile IPs
    • 24/7 global support

    Promo

    Getting Started with Bright Data’s Chile proxies

    1. Start Free Trial: No credit card required.
    2. Integration: Use our APIs or Control Panel to manage IPs and configurations.
    3. Supported Languages: Quick start examples provided for Python, Java, C#, Node.js, and Shell.

    Integrations

    Our Chile proxies integrate with popular tools and frameworks, including:

    Popular Use Cases

    Explore how businesses leverage Chile proxies:

    FAQ

    What is an Chile proxy server?

    An Chile proxy server is a server based in Chile that serves as an intermediary between your device and the internet. It provides anonymity, helps bypass restrictions and blocks, enables web content scraping, and enforces content filtering policies.

    Can I target ZIP codes across Chile?

    Yes, you can choose IPs using Chile zip code level targeting. Bright Data also offers city and state level proxy targeting.

    What types of plans are available?

    Bright Data offers flexible pricing models, including:

    • Pay-As-You-Go: Fixed rate per GB.
    • Subscription Plans: Monthly, yearly, and custom options.

    Are Bright Data’s Chile Proxies compliant and safe to use?

    Bright Data’s proxies are ethically sourced, and we comply with all relevant data protection laws, including GDPR and CCPA.

    Is there dedicated support available?

    Our dedicated support team is available 24/7 to assist you. Contact us to discuss your needs and maximize the benefits of our Dedicated proxy network.

    Visit original content creator repository https://github.com/luminati-io/Chile-Proxies
  • speech-recognition-aws-polyfill

    speech-recognition-aws-polyfill

    package size vulnerabilities

    A polyfill for the experimental browser Speech Recognition API which falls back to AWS Transcribe.

    Features

    Note: this is not a polyfill for MediaDevices.getUserMedia() – check the support table in the link above.

    Who is it for?

    This Library is a good fit if you are already using AWS services (or you would just prefer to use AWS).

    A polyfill also exists at: /antelow/speech-polyfill, which uses Azure Cognitive Services as a fallback. However, it seems to have gone stale with no updates for ~2 years.

    Prerequisites

    • An AWS account
    • A Cognito identity pool (unauthenticated or authenticated) with the TranscribeStreaming permission.

    AWS Setup Guide

    1. In the AWS console, visit the Cognito section and click Manage Identity Pools.
    2. Click Create new identity pool and give it a name.
    3. To allow anyone who visits your app to use speech recognition (e.g. for public-facing web apps) check Enable access to unauthenticated identities
    4. If you want to configure authentication instead, do so now.
    5. Click Create Pool
    6. Choose or create a role for your users. If you are just using authenticated sessions, you are only interested in the second section. If you aren’t sure what to do here, the default role is fine.
    7. Make sure your role has the TranscribeStreaming policy attached. To attach this to your role search for IAM -> Roles, find your role, click “Attach policies” and search for the TranscribeStreaming role.
    8. Go back to Cognito and find your identity pool. Click Edit identity pool in the top right and make a note of your Identity pool ID

    Usage

    Install with npm i --save speech-recognition-aws-polyfill

    Import into your application:

    import SpeechRecognitionPolyfill from 'speech-recognition-aws-polyfill'

    Or use from the unpkg CDN:

    <script src="https://unpkg.com/speech-recognition-aws-polyfill"></script>

    Create a new instance of the polyfill:

    const recognition = new SpeechRecognitionPolyfill({
      IdentityPoolId: 'eu-west-1:11111111-1111-1111-1111-1111111111', // your Identity Pool ID
      region: 'eu-west-1' // your AWS region
    })

    Alternatively, use the create method.

    const SpeechRecognition = SpeechRecognititionPolyfill.create({
      IdentityPoolId: 'eu-west-1:11111111-1111-1111-1111-1111111111', // your Identity Pool ID
      region: "eu-west-1"
    });
    
    const recognition = new SpeechRecognition()

    You can then interact with recognition the same as you would with an instance of window.SpeechRecognition

    The recognizer will stop capturing if it doesn’t detect speech for a period. You can also stop manually with the stop() method.

    Support Table

    Properties

    Property Supported
    lang Yes
    grammars No
    continuous Yes
    interimResults No
    maxAlternatives No
    serviceURI No

    Methods

    Method Supported
    abort Yes
    start Yes
    stop Yes

    Events

    Events Supported
    audiostart Yes
    audioend Yes
    start Yes
    end Yes
    error Yes
    nomatch Yes
    result Yes
    soundstart Partial
    soundend Partial
    speechstart Partial
    speechend Partial

    Full Example

    import SpeechRecognitionPolyfill from 'speech-recognition-aws-polyfill'
    
    const recognition = new SpeechRecognitionPolyfill({
      IdentityPoolId: 'eu-west-1:11111111-1111-1111-1111-1111111111', // your Identity Pool ID
      region: 'eu-west-1' // your AWS region
    })
    recognition.lang = 'en-US'; // add this to the config above instead if you want
    
    document.body.onclick = function() {
      recognition.start();
      console.log('Listening');
    }
    
    recognition.onresult = function(event) {
      const { transcript } = event.results[0][0]
      console.log('Heard: ', transcript)
    }
    
    recognition.onerror = console.error

    Demo

    Check the examples folder for a simple HTML page that shows how to use the polyfill. Replace the placeholder AWS credentials with your own before running the example.

    Roadmap

    • Further increase parity between the two implementations by better supporting additional options and events.
    • Build a companion polyfill for speech synthesis (TTS) using AWS Polly
    • Provide a way to output the transcription as an RxJS observable

    Contributing and Bugs

    Questions, comments and contributions are very welcome. Just raise an Issue/PR (or, check out the fancy new Github Discussions feature)

    License

    MIT

    Visit original content creator repository https://github.com/ceuk/speech-recognition-aws-polyfill
  • credential_rotation

    AWS Secrets Manager Credential Rotation

    Rotating credentials is an important part of infosec.. The problem is, you really don’t want people to know the new secret.. That’s where this comes in.. Run a python script – the current secret, is replaced with a newly generated secret. Following, you run another Python script to cycle the credentials of each service you need to rotate using the new secrets generated in SecretsManager.

    There is one small problem though – not all services you need to rotate will be online at any one time… to accomodate servers that are currently offline, unavailable, or otherwise “un-rotate-able”, I’ve added an archive system. This allows us to effectively “cache” secrets for a period of time after rotation. This is a flexible value defined in weeks, however, you could do years, months, hours, minutes, or seconds.. that way, you can cycle passwords as often as you want, and you will still be able to catchup by “remembering” old secrets… bringing previously unavailable services, to compliance, even if they miss multiple secret rotations.. This avoids having to reset services to “factory”, just to bring them up to compliance with the current secrets.

    This isn’t exactly intended to be cloned and ran in your own enviornment, this is a proof of concept.. You can, but some assembly required… namely in the following env vars:

    Features

    • Allows servers that miss a credential cycle, to be reprovisioned by the credential shuffle tool, to the new secret.
    • Allows you to add a archived secret on-demand, in the event a server has a secret in-use that is not known to the software.
    • Reduces the risk of malpractice with credentials, as end users shouldn’t have access to secrets. Only applications.
    • Automatically removes secrets past a certain age
    • Allows you to cycle ALL secrets in one Python script (optional – the “universal” Python files…)
    • Have a really awful password you used multiple places? Add it to all archives in one Python script… (optional – the “universal” Python files…)

    Random Bits

    Adding a password on an ad-hoc basis (meaning, non-generated password)

    ivans-Mac-mini:aws-secrets-mgr-learning ivan$ python3 zabbix_create_archive_secret.py potato626
    Getting the secret detail for zabbix_secret_archive
    Adding manually defined secret to archive
    Expiration time
    Checking for any expired secrets
    No expired secrets to remove...
    Resyncing the secret archive...
    ivans-Mac-mini:aws-secrets-mgr-learning ivan$ 
    

    This way, it’s automatically added into the Secret Manager Archive, so as the software comes across the secret, it will be able to reprovision it to be the new secret.

    Creating a new secret for a service (current password output probably should be removed for production)

    ivans-Mac-mini:aws-secrets-mgr-learning ivan$ python3 zabbix_rotate_secret.py 
    Getting the secret detail for zabbix_secret
    The current secret is A8dZWqTXNL6e6UoCpZXjzrxvntVziD - Now Rotating...
    Now adding prior production secret to the secrets archive and checking for expired archive passwords
    Getting the secret detail for zabbix_secret_archive
    Adding current production secret to archive
    Expiration time
    Checking for any expired secrets
    No expired secrets to remove...
    Resyncing the secret archive...
    ivans-Mac-mini:aws-secrets-mgr-learning ivan$ 
    

    Changing User Credential on a Service (in this case, Proxmox)

    ivans-Mac-mini:aws-secrets-mgr-learning ivan$ python3 proxmox_change_user_credential.py 
    Getting the secret detail for lab_password
    Getting the secret detail for lab_password_archive
    Trying with credential...
    Changing secret...
    Verifying rotation successful
    Credential successfully rotated..
    ivans-Mac-mini:aws-secrets-mgr-learning ivan$ 
    

    Service being “behind” on credential rotations:

    ivans-Mac-mini:aws-secrets-mgr-learning ivan$ python3 proxmox_change_user_credential.py 
    Getting the secret detail for lab_password
    Getting the secret detail for lab_password_archive
    Trying with credential...
    Trying with credential...
    Trying with credential...
    Trying with credential...
    Trying with credential...
    Trying with credential...
    Trying with credential...
    Trying with credential...
    Trying with credential...
    Changing secret...
    Verifying rotation successful
    Credential successfully rotated..
    ivans-Mac-mini:aws-secrets-mgr-learning ivan$ 
    

    Notes

    Although this does work, shuffling host secrets in a simple little python script is incredibly inefficient as your scale goes up.. Having a little cluster of “password shuffler workers”, for each service.. would be so much more handy.. So select hosts where service like “%MSSQL%” and put all of those hosts in a RabbitMQ queue for rotation… Then the worker bees can pick it up and get to work reshuffling based on the credential.

    To keep AWS costs “down” (10,000 API queries = $0.04, so if you had 100,000 hosts, 3-4 queries each.. each rotation will cost money.. So cacheing credentials for the workers, would be hugely beneficial. Almost so, that you could just spin up their containers, with an ENV var for the credentials they need to shuffle.

    Caching Credentials Cost Saving Ideas:

    • Credential Cycle Worker Nodes query a Redis instance for credentials.. Redis instance, saves data for 5 minutes, upon which it’ll re-query AWS.. keeping query costs down..
    • Credential Cycle Worker Nodes get a copy of the secrets in their deployment file, but the problem with that is you need to destroy their deployment and redeploy for each cycle. Not impossible, but not ideal.

    How-To

    ~/.aws/credentials file:

    ivans-Mac-mini:~ ivan$ cat ~/.aws/credentials 
    [default]
    aws_access_key_id={{ redacted }}
    aws_secret_access_key={{} redacted }}
    ivans-Mac-mini:~ ivan$ 
    

    ~/.bashrc file:

    ivans-Mac-mini:~ ivan$ cat ~/.bashrc | grep secret
    export secret_archive={{ redacted }}
    export secret_name={{ redacted }}
    export secret_proxmox_default=root
    ivans-Mac-mini:~ ivan$ 
    

    Misc

    Forgive me, this is my first time using the AWS API, so best practices were used to the best of my abilities here..

    If you like my work, go check me out on LinkedIn
    https://www.linkedin.com/in/ivanshires

    Visit original content creator repository
    https://github.com/IvanShires/credential_rotation

  • vscode-surround

    Surround

    Visual Studio Marketplace Visual Studio Marketplace GitHub last commit License


    A simple yet powerful extension to add wrapper snippets around your code blocks.

    Features

    • Now works on VSCode for Web 🚀New!
    • Supports language identifiers
    • Supports multi selections
    • Fully customizable
    • Custom wrapper snippets
    • You can assign shortcuts for each wrapper snippets separately
    • Nicely formatted (Preserves indentations)
    • Sorts recently used snippets on top

    Demo 1: Choosing a wrapper snippet from quick pick menu

    Demo 1

    Demo 2: Wrapping multi selections

    Demo 2

    How To Use

    After selecting the code block, you can

    • right click on selected code
    • OR press (ctrl+shift+T) or (cmd+shift+T)

    to get list of commands and pick one of them.

    Hint

    Each wrapper has a separate command so you can define keybindings for your favorite wrappers by searching surround.with.commandName in the ‘Keyboard Shortcuts’ section.

    List of commands

    Command Snippet
    surround.with (ctrl+shift+T) List of all the enabled commands below
    surround.with.if if ($condition) { … }
    surround.with.ifElse if ($condition) { … } else { $else }
    surround.with.tryCatch try { … } catch (err) { $catchBlock }
    surround.with.tryFinally try { … } finally { $finalBlock }
    surround.with.tryCatchFinally try { … } catch (err) {$catchBlock} finally { $finalBlock }
    surround.with.for for ($1) { … }
    surround.with.fori for (let i = 0; … ; i = i + 1) { … }
    surround.with.forEach items.forEach((item) => { … })
    surround.with.forEachAsync items.forEach(async (item) => { … })
    surround.with.forEachFn items.forEach(function (item) { … })
    surround.with.forEachAsyncFn items.forEach(async function (item) { … })
    surround.with.arrowFunction const $name = ($params) => { … }
    surround.with.asyncArrowFunction const $name = async ($params) => { … }
    surround.with.functionDeclaration function $name ($params) { … }
    surround.with.asyncFunctionDeclaration async function $name ($params) { … }
    surround.with.functionExpression const $name = function ($params) { … }
    surround.with.asyncFunctionExpression const $name = async function ($params) { … }
    surround.with.element <element>…</element>
    surround.with.comment /** … */
    surround.with.region #region $regionName … #endregion
    surround.with.templateLiteral 🚀New! ... (Also replaces single and double quotes with backtick)
    surround.with.templateLiteralVariable 🚀New! ${...} (Also replaces single and double quotes with backtick)
    surround.with.iife 🚀New! (function $name($params){ … })($arguments);

    Options

    • showOnlyUserDefinedSnippets (boolean): Disables default snippets that comes with the extension and shows only used defined snippets.
    • showRecentlyUsedFirst (boolean): Recently used snippets will be displayed on top.
    • showUpdateNotifications (boolean): Shows notification when there is a new version of the extension.

    Configuration

    Each wrapper snippet config object is defined as ISurroundItem like below:

    interface ISurroundItem {
      label: string; // must be unique
      description?: string;
      detail?: string;
      snippet: string; // must be valid SnippetString
      disabled?: boolean; // default: false
      languageIds?: string[];
    }

    Editing/Disabling existing wrapper functions

    Go to “Settings” and search for “surround.with.commandName“.

    Example surround.with.if:

    {
      "label": "if",
      "description": "if ($condition) { ... }",
      "disabled": false,
      "snippet": "if(${1:condition}) {\n\t$TM_SELECTED_TEXT\n}$0"
    }

    Adding new custom wrapper functions

    Go to “Settings” and search for surround.custom and edit it like below.

    {
      "surround.custom": {
        // command name must be unique
        "yourCommandName": {
          // label must be unique
          "label": "Your Snippet Label",
          "description": "Your Snippet Description",
          "snippet": "burrito { $TM_SELECTED_TEXT }$0", // <-- snippet goes here.
          "languageIds": ["html", "javascript", "typescript", "markdown"]
        },
        // You can add more ...
      }
    }

    Defining language-specific snippets

    With version 1.1.0, you can define snippets based on the document type by using languageIds option.

    Visit VSCode docs the full list of language identifiers.

    1. Enabling a snippet for ALL languages

    If you want to allow a snippet to work for all document types, simply REMOVE languageIds option.

    OR set it to ["*"] as below:

    {
      "label": "if",
      "description": "if ($condition) { ... }",
      "disabled": false,
      "snippet": "if(${1:condition}) {\n\t$TM_SELECTED_TEXT\n}$0",
      "languageIds": ["*"] // Wildcard allows snippet to work with all languages
    }

    2. Enabling a snippet for ONLY specified languages

    If you want to allow a snippet to work with html, typescript and typescriptreact documents, you can use the example below.

    {
      "label": "if",
      "description": "if ($condition) { ... }",
      "disabled": false,
      "snippet": "if(${1:condition}) {\n\t$TM_SELECTED_TEXT\n}$0",
      "languageIds": ["html", "typescript", "typescriptreact"]
    }

    3. Disabling a snippet for ONLY specified languages

    If you want to allow a snippet to work with all document types EXCEPT html, typescript and typescriptreact documents, you can add - (MINUS) sign as a prefix to the language identifiers (without a whitespace).

    {
      "label": "if",
      "description": "if ($condition) { ... }",
      "disabled": false,
      "snippet": "if(${1:condition}) {\n\t$TM_SELECTED_TEXT\n}$0",
      "languageIds": ["*", "-html", "-typescript", "-typescriptreact"]
    }

    IMPORTANT NOTES:

    1. All command names and labels must be unique. If you do not provide a unique command name or label, your custom wrapper functions will override existing ones.
    2. You can redefine all snippets as long as you provide a valid SnippetString. Read More

    Contribution

    As always, I’m open to any contribution and would like to hear your feedback.

    PS: Guide for running @vscode/test-web on WSL 2

    Just an important reminder:

    If you are planning to contribute to any open source project, before starting development, please always open an issue and make a proposal first. This will save you from working on features that are eventually going to be rejected for some reason.

    Logo

    I designed the logo on canva.com and inspired by one of their free templates.

    LICENCE

    MIT (c) 2021 Mehmet Yatkı

    Enjoy!

    Visit original content creator repository https://github.com/yatki/vscode-surround