Blog

  • cssSweet

    cssSweet

    Version: 5.3.0-beta1

    Author: YJ Tso @sepiariver

    cssSweet is a suite of tools for processing (S)CSS. It comes with several output modifiers to manipulate CSS values, and a plugin that concatenates and processes (S)CSS from specified Chunks and outputs to a minified CSS file. version 2+ also concatenates and minifies JS with a 2nd plugin.

    Find out more about cssSweet here

    as well as on the documentation site:

    https://docs.modx.org/current/en/extras/csssweet (this one needs updating)

    Thank you to contributors: @matdave and the MODX team

    Example Use Cases

    • Use system or context settings to store primary colors in a site’s color scheme, then process all other color values relative to these, so you can shift the entire color theme by modifying a few settings.
    • Use in conjunction with ClientConfig to give site owners a nice UI to manage CSS styles–but only the ones you expose, and only in the manner you choose!
    • Author MODX “themes” that are customizable by the end user.
    • Use other MODX tags & placeholders in your CSS. Utilize “dynamic CSS” without the performance penalty, because the plugin writes the static CSS file on the Manager Clear Cache and Chunk Save actions, not per request.
    • Manage your Sass, CSS, and JS development workflow right from inside the MODX Manager.
    • Add a code editor like Ace, and you can use MODX as your IDE for front-end development.

    NOTE: please see section below on potentially breaking changes when upgrading from cssSweet version 1.x.

    Usage

    Installation

    You can install cssSweet via the MODX Extras Installer. Or you can download it from the MODX Extras Repo or from the _packages directory. Upload the package to the packages subdirectory of your MODX install’s core directory, and use the “Search Locally for Packages” feature in the Extras Installer to find and install the package.

    CSS Sweetness

    Once installed, you’ll have a default Chunk in the “cssSweet” category. If you edit that Chunk and click the “Manage” » “Clear Cache” main menu item, a CSS file will be generated for you at
    [[++assets_path]]components/csssweet/custom_css.min.css

    Note: it’s highly recommended to create new Chunks with unique names. As of version 2.x, the cssSweet package has been configured to not update an existing Chunk with the same name, but I haven’t tested that thoroughly yet. I’d hate for it to fail in your production environment.

    Reference the generated CSS file in your template, like this
    <link rel="stylesheet" href="https://github.com/sepiariver/[[++assets_url]]components/csssweet/custom_css.min.css">
    and you’ll be good to go.

    Customization

    In the Plugin properties, you can set the names of Chunks that you wish to process and include, in a comma-separated list. (As of version 2, this is required for the plugin to do anything.)

    IMPORTANT NOTES:

    1. Put your customized properties into a new property set, so that they won’t be overwritten on upgrade. In this case, ensure the Events are triggered using your custom property sets. Check the “System Events” tab in the Plugin Edit View.
    2. Make sure to enable the checkbox at the bottom of the “Properties” tab, that says “Pre-process tags in Property Values” if you are using MODX placeholders like [[++assets_path]].

    You can include static Chunks that reference files–even minified files. You can also customize the filesystem location to which to write the output file. Chunks will be included in the order which they appear in the comma-separated list. As of version 2, cssSweet will parse any SCSS syntax in your Chunks, and log error messages generated by the scssphp processor class.

    Events

    You can optionally enable the OnChunkFormSave Event in the Plugin events tab. (As of version 2, this event is enabled by default.)

    Doing so will speed up your process immensely, as a new output file will be generated each time you save a Chunk that is in the list of Chunks you’ve set.

    As of version 4.1, you can also enable the custom ClientConfig_ConfigChange event, if you have the ClientConfig Extra installed.

    As of version 5.1, an un-tested—and at this time unsupported—feature exists whereby you can enable the OnDocFormSave event, at which point saving a Resource with contentType = text/css will trigger the Plugin to execute. You still need to configure a Chunk where you include the content of the css Resources via a Snippet of some kind.

    “Dev” Mode

    As of version 4, the dedicated “dev mode” properties have been removed, and the dev_mode Plugin property is a textfield rather than boolean. By entering a (string) namespace, the plugin will use the properties prefixed with {$namespace}_, allowing you to process a different set of Chunks, output to a different file, or override any Plugin property.

    This allows for multiple workflows and output files. You can use it to build moderately-sized bundles of assets for performance or build a different output file for different Contexts.

    Snippets

    cssSweet installs with a suite of utility Snippets to manipulate style declarations. See the files in the Snippets folder for more detailed usage examples. As of version 5.x, the Snippets use ozdemirburak/iris for color manipulation.

    • csssweet.convert: Convert color values to any other supported format.
    • csssweet.extract: Extract channel values, from any supported format.
    • csssweet.lighten: Lighten or darken a color value, in any supported format.
    • csssweet.modval: Modifies the numeric value in a string.
    • csssweet.prefix: Naively adds vendor prefixes to a string.
    • csssweet.saturate: Saturate or desaturate a color value, in any supported format.

    Potentially Breaking Changes (especially when upgrading from version 1.x or to 5.x)

    The utmost care has been taken to ensure that upgrades of cssSweet are as safe as possible. However, there are a few scenarios that could potentially break an existing site.

    Version 5.x changes the behaviour of the included Snippets significantly. The new Snippets install with new names, so your existing implementation should continue to work, but it’s worth experimenting with the new Snippets to see how the output compares. There should be no drastic, breaking effects.

    If you have a legacy installation, upgrading from version 1 to a later version, the following points should help you avoid any major issues:

    1. The default property set. It’s an established pattern that updating an Element in MODX also updates its default property set. If you’ve customized the default property set of the cssSweet Plugins, you must move your custom properties to a custom property set, in order to preserve them.
    2. Some property keys have changed. Most notably, custom_css_chunk is now custom_scss_chunks to more accurately describe the plugin’s actions. Ensure that after upgrading, your CSS Chunk names are listed in the new property, rather than the old one.
    3. The sample Chunk has a different name. This served 2 purposes: to demonstrate the scss syntax compatibility, and prevent overwriting the default Chunk on upgrade, because some users (including myself) erroneously customized the default Chunk without changing its name. As with any MODX Extra that installs Chunks, it’s highly recommended that you create new Chunks or rename the sample Chunk. That said, the cssSweet 2.x packages have been authored to not overwrite existing Chunks (with the help of @TheBoxer ‘s GitPackageManagement component), but this remains minimally tested.
    4. The default output filename has changed. In an effort to prevent overwriting your existing compiled CSS before you’ve had a chance to set the properties correctly, I’ve changed the default CSS output filename. However, if by sheer chance, you had previously customized your output filename to custom_css.min.css, then the saveCustomCss plugin will overwrite it by default! In this (probably rare) case, make sure to setup the plugin properties correctly before executing the plugin.
    5. “Pre-process tags in Property Values.” This checkbox gets disabled on upgrades. If you’re using MODX placeholder tags in your properties, then be sure to enable this again. In version 5.x this should be preserved on upgrade.
    6. In version 4, the “dev_mode” property keys have been removed from the default property set. They’re no longer relevant, unless you set the dev_mode property to the namespace “dev”, but you can set the namespace to whatever you want.

    Thanks

    A lot of time, research and consideration was put into which libraries should be included in this package, for the minification functions. I whole-heartedly support these fine developers and their open-source projects. Please extend your thanks to these folks, if you find cssSsweet useful (or even if you don’t :P)

    @scssphp/scssphp

    @tedious/Jshrink

    @ozdemirburak/iris

    Visit original content creator repository
    https://github.com/sepiariver/cssSweet

  • Emergent_Constraints

    Emergent Constraints

    Basic python code for calculating the emergent constraint method, which is based on the Cox et al., 2013.
    The emergent constraint method is reducing the uncertainty or diversity of future projections in individual models by current states (Hall et al., 2019).
    Due to diverse equations and parameterizations, the errors are accumulated through time integration.
    Therefore, the Earth system models (ESMs) often projects diversity even in a single model, and larege diversity in inter-model dimension.
    Then, we cannot trust the future projections in ESMs. We need to reduce the uncertainty of future projections to make reliable ranges.
    The emergent constrain method can reduce the uncertainty of future projections by relationship between current state and future changes.
    For example, our paper represents the relationship between current nitrate climatology and future Arctic chlorophyll and productivity changes.

    This code’s Arctic chlorophyll estimations are published at the Earth’s Future (AGU)

    Title : Emergent Constraint for Future Decline in Arctic Phytoplankton Concentration

    Listed co-author(s) : Kyung Min Noh, Hyung-Gyu Lim, Eun-Jin Yang, and Jong-Seong Kug

    Corresponding Author : Hyung-Gyu Lim, and Jong-Seong Kug

    1. Provided Data

    CHL, NO3, PP projections from the CMIP5 and CMIP6 were used for emergent constrained method.
    Additionally, the climatology of NO3 was used to constrain the estimations in CHL projections.
    You can download these reanalysis and CMIP data from below URL.

    2. Code composition

    • emergent_constraint.py [basic python functions for emergent constrained method]
    • Emergent_Constraints.ipynb [Jupyter codes for drawing plots]

    Before start the codes, you need to download the dataset to DATA folder, which is located same path on python and jupyter code.

    All output pdf files will be saved on the RESULT directory.

    Visit original content creator repository
    https://github.com/blackcata/Emergent_Constraints

  • Mustache-Reports

    Mustache-Reports

    An example of using the mustache reports server code base to generate reports in docx using node and LibreOffice to convert to PDF.

    You will need to make sure both node and libreoffice 5 are installed on your computer to run this example.

    This example is rough and ready, please log an issue if you require assistance.

    There are now nuget packages which contain the core report rendering logic, removing the need to manually manage node packages in your solution.

    The word file generations happens using docx-templater and xlsx-template. It is written in node and uses mustache templating to populate the report.
    You will need to model your report data in JSON for the templating to work, and because docx-templater is so awesome you can use angular expression to modify reporting data at runtime. It is unknown if xlsx-template also supports angular expressions, if not I will add it soon.

    Have a look at reportRender.js ReportRender.prototype.configureAngularExpressions method – you can add your own customer angular expressions here.
    Please note there are currently plans to abstract this allowing your to specify your own angular expressions file without needing to modify the core package. This is one of my main focuses

    I have also added a custom image handling code to allow for base64 encoded image data to be part of the JSON payload – have a look at reportRender.js ReportRender.prototype.getOptions method for more detail.
    Please note this is now a paid for feature of docx-templater, good thing we got the last version of the open source image module

    This example makes use of TddBuddy’s Clean Architecture and Synchronous Process Execution packages.

    Visit original content creator repository
    https://github.com/Kode-Rex/Mustache-Reports

  • lunar-template

    Lunar Template


    Wait…it’s all Lua?

    NotITG is a fork of OpenITG designed to make it easier for mod file creators to implement their ideas. The Mirin Template provides functions that allow creators to use NotITG express their mod ideas and bring them to life in the game. -XeroOl

    Always has been.

    The Mirin Template is an extremely powerful template that has an fast growing fanbase. With this power in mind, a Stepmania template has been created, but is not as greatly supported, and plugins for said template is not maintained in-house. Porting modfiles between NotITG and Stepmania has always been a great challenge, especially when dealing with Actors. What new syntax do I have to learn? Why is Quad not showing my texture? How do AFTs even work?

    The Lunar Template tries its best to fix these issues.

    Built off the Mirin Template, the Lunar Template is an ongoing effort to make porting modfiles between NotITG and its OutFox sister much less stressful and time-consuming. It uses the same syntax for modding, but uses a more OutFox friendly approach to Actors.

    (Full documentation for mods can be found here)


    Syntax

    Mods

    -- turn on invert
    ease {0, 1, outExpo, 100, 'invert'}
    -- turn off invert
    ease {7, 1, outExpo, 0, 'invert'}

    Actors

    -- make a quad
    Def.Quad {
        Name = 'Quad',
        OnCommand = function(self) self:zoom(64) end
    },
    -- make an actorframe with children
    Def.ActorFrame {
        Name = 'myActorFrame',
        Def.ActorProxy {
            Name = 'myActorProxy',
            OnCommand = function(self)
                self:SetTarget(myActor)
            end
        },
        Def.Sprite { Name = 'mySprite', Texture = 'myTexture.png' }
    }

    Recursive Actors

    xero() -- outside the main actorframe
    -- make an empty actorframe called myQuads
    local quads = Def.ActorFrame { Name = "myQuads" }
    -- for-loop and add 10 quads
    for i = 1, 10 do
        quads[#quads + 1] = Def.Quad { Name = "myQuad" .. i }
    end
    return Def.ActorFrame {
        LoadCommand = function(self)
        ... -- Mods
        end,
        -- add it as a child to main actorframe
        quads,
        -- other actors
        Def.ActorProxy { Name = 'PP[1]' },
        Def.ActorProxy { Name = 'PP[2]' },
        ... -- Actor
    }

    So, how do I port it?

    You load the mirin-porting.lua script from Tiny-Foxes in your mods.lua, drag and drop your modfile into Stepmania, delete the default.xml in the template folder, and make minor edits until your file looks 1:1. That’s really about it. If you need help with porting, feel free to send a message in the OutFox Discord and you’ll be sure to get the help you need. Most of the porting is done for you, thanks to the modport.lua script. Some things, like AFTs and tween scaling, may need some additional polish, but the bulk of it all should be done from here. In fact, you could even make separate actor files for NotITG and OutFox, if you really want porting to be virtually seamless.


    What about collabs?

    You can supercharge them. Take the Mirin template’s quick modwriting and powerful node system to the next level with Lunar’s elegant actor syntax and extreme portability.
    Some recommended setups for different use cases:


    Just Mods

    -- in mods.lua
    xero()
    return Def.ActorFrame {
        LoadCommand = function(self)
        ... -- Mods
            loadfile('lua/sudo.lua')() -- Sudo
            loadfile('lua/xero.lua')() -- Xero
        end,
        ... -- Actors
    }
    
    -- in sudo.lua
    xero()
    ease {6, 4, spike, -200, 'tiny'}
    ... -- Mods

    Mods and Actors

    -- in mods.lua
    xero()
    return Def.ActorFrame {
        LoadCommand = function(self)
            ... -- Mods
        end,
        loadfile('lua/sudo.lua')(), -- Sudo
        loadfile('lua/xero.lua')(), -- Xero
        ... -- Actors
    }
    
    -- in sudo.lua
    xero()
    return Def.ActorFrame {
        Name = 'Sudo' -- optional but useful
        LoadCommand = function(self)
            ease {6, 4, spike, -200, 'tiny'}
            ... -- Mods
        end,
        Def.Quad { Name = 'TheBoy' }
        ... -- Actors
    }

    Mods, Actors, and Assets

    -- in mods.lua
    xero()
    return Def.ActorFrame {
        LoadCommand = function(self)
            ... -- Mods
        end,
        loadfile('lua/sudo/mods.lua')(), -- Sudo
        loadfile('lua/xero/mods.lua')(), -- Xero
        ... -- Actors
    }
    
    -- in sudo.lua
    xero()
    return Def.ActorFrame {
        Name = 'Sudo'
        LoadCommand = function(self)
            ease {6, 4, spike, -200, 'tiny'}
            ... -- Mods
        end,
        Def.Sprite { Name = 'Beb', Texture = 'lua/sudo/warmfren.png' }
        ... -- Actors
    }

    The Lunar Template is designed to fit and streamline your style.


    Known Issues

    • Extra players are not supported for SM5 (halted for OutFox) Supported in OutFox! Have fun <3
    • AFTs are not perfectly portable (needs significant effort to fix) Use Def.ActorScreenTexture!

    To-Do

    1. Look into possible ways to port AFTs 1:1 Done!

    Huge Warm Hugs to These People

    XeroOl – Original Mirin Template
    ArcticFqx – Recursive XML trick for NotITG
    HeySora – Encouragement and direction
    Mr.ThatKid – Motivation and support
    Kinoseidon – Direct contributor!

    Visit original content creator repository
    https://github.com/Sudospective/lunar-template

  • norns.el

    norns.el

    logo

    Interactive development environment for monome norns from Emacs.

    Support for targeting remote norns instances (via TRAMP) or even Emacs running on norns itself (untested).

    Several norns instances can be interacted with concurently (all buffers are namespaced by norns’ hostname).

    GNU Emacs MELPA

    Installation

    (use-package norns
      :config
      (add-hook 'lua-mode-hook #'norns-mode-maybe-activate)
      (add-hook 'sclang-mode-mode-hook #'norns-mode-maybe-activate))

    Additionally one can map keyboard shortcuts:

    (use-package norns
      :bind (
             :map norns-mode-map
             ;; NB: those keybindings are inspired by John Wiegley's
             ("C-c e b" . norns-load-current-script)
             ("C-c e r" . norns-send-selection)
    
             :map norns-matron-repl-mode-map
             ("C-c e b" . norns-rerun)
    
             :map norns-sc-repl-mode-map
             ("C-." . norns-sc-stop))
        ;; [...]
        )

    If you access a norns through a router / LAN, please set norns-lan-domain to your local LAN domain (defautl value is generally lan or home). Otheriwe emacs’ websocket often has trouble connecting to the mDNS domain advertized by norns (typical error message: websocket-open: norns.local/5555 Name or service not known).

    (use-package norns
      ;; [...]
      :init
      (setq norns-lan-domain "lan")
      ;; [...]
    )

    Commands

    All commands (unless specified otherwise) will analyze if currently visited file is on a norns.

    If it’s the case, this particular norns is targeted by the command execution. Otherwise the default norns instance (configurable w/ norns-host / norns-mdns-domain is targeted instead).

    A matron REPL (*matron/<NORNS_HOSTNAME>*) or SuperCollider REPL (*norns-sc/<NORNS_HOSTNAME>*) is spawned and pops in a new window.

    Those behaviors can be customized by tweaking the values of norns-access-policy and norns-repl-switch-on-cmd.

    (norns-matron-repl) / (norns-sc-repl)

    Spawn and switch to matron REPL / SuperCollider REPL for norns instance.

    (norns-docker-matron-repl) / (norns-docker-sc-repl)

    Same as above but connects to a localy-running dockerized norns instance (see winder/norns-dev).

    Requires package docker-tramp to access the container’s filesystem.

    If using a custom container name, tweak value of norns-docker-container. Likewise, you may need to adjust the value of norns-local-mdns-domain if your LAN domain is other than lan.

    (norns-matron-send TXT) / (norns-sc-send TXT) / (norns-send TXT)

    Prompt user to enter raw text TXT command and sends it to matron / SuperCollider.

    Generic version (norns-send) auto-selects the right command according to current buffer mode.

    (norns-matron-send-selection) / (norns-sc-send-selection) / (norns-send-selection)

    Same as above, but acts on selection (active region in Emacs lingo).

    (norns-load-current-script)

    Ask the visited script to be loaded by the visited norns.

    Will fail if currently visited file is not part of a norns script.

    (norns-load-script)

    Prompt user for list of available norns scripts and launch the one selected.

    (norns-restart) / (norns-reboot)

    norns-restart restarts all norns services. Respawns the matron and SuperCollider REPLs.

    norns-reboot performs a full OS reboot (for when things get stuck bad).

    (norns-screenshot <FILENAME>) / (norns-screen-dump <FILENAME>)

    Take a screenshot of norns screen. Save it on norns itself under norns-screenshot-folder.

    norns-screen-dump does the same but is lower level. It directly dumps what is in the screen memory buffer and doesn’t perform scaling / quantized greyscale conversion to match how it appears IRL.

    Configuration

    Several norns can be managed by this package.

    Default value of norns-access-policy (:current-fallback-default) makes the execution of commands resolve to the currently visited norns instance or fallbacks to the “default” one.

    To always use the default instance (absolute lookup), change this value to :default. Otherwise, to only try the currently visited instance (relative lookup) set it to :current.

    The default norns instance declaration is accessible through vars norns-host, norns-mdns-domain and norns-local-mdns-domain. norns-mdns-domain is the mDNS domain advertized by norns (typically local) and norns-local-mdns-domain is the one of the local network that both norns and your computer connect to (generally lan or home).

    On command execution, the matron or SuperCollider buffer (of the corresponding instance) will pop to current frame (can be disabled by setting norns-repl-switch-on-cmd to nil) w/ method norns-repl-switch-fn (defaults to switch-to-buffer-other-window).

    This new window will not steal focus, but one can change that by setting norns-repl-switch-no-focus to nil.

    Advanced usages

    If you want commands to interact w/ a specific norns instance independently of your current location, just define your own commands like so:

    (use-package norns
      ;;  [...]
    
      :config
      (defun norns2-send (cmd)
        (interactive "s> ")
        (let ((norns-access-policy :default)
              (norns-host "norns2"))
          (norns-send cmd))))

    OSC commands

    The package used to embed OSC-based commands to simulate button & encoder presses.

    The osc.el package appears to be doing some unholy stuff (negative Unix timestamps) which somehow works on Linux x82_64 builds but does not on ARM nor WinNT. Furthermore, as it’s in a defconst it cannot be monkeypatched.

    As a result I decided to remove this dependency.

    I may reintroduce it once it gets fixed.

    In the meantime, you could add back the OSC-based feature by dropping that in your init.el:

    (require 'osc)
    
    
    ;; VARS
    
    (defvar norns-osc-port 10111 "Default norns OSC protocol port.")
    
    
    ;; IO - OSC
    
    (defun norns--osc-send (p &rest args)
      "Send OSC message to current norns (w/ path P and optional ARGS)."
      (let* ((default-directory (norns--location-from-access-policy))
             (host (norns--core-curr-host))
             (client (osc-make-client host norns-osc-port)))
        (apply #'osc-send-message client p args)
        (delete-process client)))
    
    (defun norns-key (n z)
      "Change state of key N to value Z (either 0 or 1) on current norns."
      (norns--osc-send "/remote/key" n z))
    
    (defun norns-key-toggle (n)
      "Simulate a user key press on key N on current norns."
      (norns-key n 1)
      (norns-key n 0))
    
    (defun norns-enc (n delta)
      "Simulate a rotation of value DELTA on encoder N on current norns."
      (norns--osc-send "/remote/enc" n delta))

    Implementation details

    Major modes for REPLs (norns-matron-repl-mode / norns-sc-repl-mode) are based on comint-mode.

    As those communications doesn’t rely on a process (but websocket communication instead), we bind a “fake” process and handle output manually by calling comint-output-filter (inside of norns--matron-output / norns--sc-output).

    This trick comes from ielm.

    Legibility

    This code uses form feeds (^L character) as separators.

    Either package form-feed or page-break-lines makes them appear as intended.

    Visit original content creator repository https://github.com/p3r7/norns.el
  • multi_metrics_to_compare_images

    compare-images

    Implementation of nine evaluation metrics to access the similarity between two images and obtain the regions of the two input images that differ. The nine metrics are as follows:

    • Root mean square error (RMSE),
    • Peak signal-to-noise ratio (PSNR),
    • Structural Similarity Index (SSIM),
    • Feature-based similarity index (FSIM),
    • Information theoretic-based Statistic Similarity Measure (ISSM),
    • Signal to reconstruction error ratio (SRE),
    • Spectral angle mapper (SAM),
    • Universal image quality index (UIQ),
    • Visual Information Fidelity (VIFP),

    Instructions

    The following step-by-step instructions will guide you through installing this package and run evaluation using the command line tool.

    Note: Supported python versions are 3.6, 3.7, 3.8, and 3.9.

    Install package library

    pip install image-similarity-measures
    python3 -m pip install -r requirements.txt

    Usage

    Parameters

      --org_img_path FILE_PATH   Path to original input image
      --pred_img_path FILE_PATH  Path to predicted image
      --metric METRIC       select an evaluation metric (fsim, issm, psnr, rmse,
                            sam, sre, ssim, uiq, vifp, all) (can be repeated)
    

    Terminal

    python main.py --org_img_path FILE_PATH --pred_img_path FILE_PATH --metric METRIC

    Example

    python main.py --org_img_path Images/1.png --pred_img_path Images/2.png --metric all

    References

    Müller, M. U., Ekhtiari, N., Almeida, R. M., and Rieke, C.: SUPER-RESOLUTION OF MULTISPECTRAL
    SATELLITE IMAGES USING CONVOLUTIONAL NEURAL NETWORKS, ISPRS Ann. Photogramm. Remote Sens.
    Spatial Inf. Sci., V-1-2020, 33–40, https://doi.org/10.5194/isprs-annals-V-1-2020-33-2020, 2020.

    H. R. Sheikh and A. C. Bovik, “Image information and visual quality,” Image Processing, IEEE Transactions on, vol. 15, no. 2, pp. 430–444, 2006.

    V. Baroncini, L. Capodiferro, E. D. Di Claudio, and G. Jacovitti, “The polar edge coherence: a quasi blind metric for video quality assessment,” EUSIPCO 2009, Glasgow, pp. 564–568, 2009.

    Z. Wang, E. P. Simoncelli, and A. C. Bovik, “Multiscale structural similarity for image quality assessment,” Conference Record of the Thirty-Seventh Asilomar Conference on Signals, Systems and Computers, 2003, vol. 2, pp. 1398–1402.

    Mittal, Anish, Rajiv Soundararajan, and Alan C. Bovik. “Making a completely blind image quality analyzer.” Signal Processing Letters, IEEE 20.3 (2013): 209-212.

    Video Quality Metrics – aizvorski

    image-similarity-measures – up42

    Visit original content creator repository
    https://github.com/quzanh1130/multi_metrics_to_compare_images

  • nitro-release

    This package hasn’t been under active development since about November 2017. It still works with nitro versions < 4.0.0.

    nitro-release

    With this package, Nitro < 4 can produce releases by using gulp release on the CLI.
    You can influence the version bump by using the --bump option.

    All possibilities in examples:

    $ gulp release --bump
    \> Version bumped from 0.0.0 -> 0.0.1
    
    $ gulp release --bump=minor
    \> Version bumped from 0.0.1 -> 0.1.0
    
    $ gulp release --bump=major
    \> Version bumped from 0.1.0 -> 1.0.0
    
    $ gulp release --bump=patch
    \> Version bumped from 1.0.0 -> 1.0.1
    

    The release configuration can be found in config.json.

    Configuration options

    release.bumpFiles (Array)

    A list of files, where a version bump should be processed.

    • example: ["package.json"]

    release.commit (Boolean)

    Defines, if the bumpFiles should be committed. A commit will have the message Release VERSION.

    • example: false

    release.commitMessage (String)

    Defines the commit message. Use %VERSION% to replace with current (bumped) version.

    • example: "Release %VERSION%"

    release.push (Boolean)

    Defines, if a commit should be pushed automatically. Only pushes, if commit is set to true.

    • example: false

    release.pushBranch (String)

    Defines the branch, which should be pushed. This should be the name of the branch, where the release happens.

    • example: "master"

    release.pushTo (String)

    Defines the remote origin name.

    • example: "origin"

    release.tag (Boolean)

    Defines, if a release git tag should be created. The name is vVERSION, e.g. v0.1.0.

    • example: false

    release.tagName (String)

    Defines the tag name. Use %VERSION% to replace with current (bumped) version.

    • example: "v%VERSION%"

    Example Release Config

    "release": {
        "bumpFiles": ["package.json"],
        "commit": false,
        "push": false,
        "pushBranch": "master",
        "pushTo": "origin",
        "tag": false
    }
    

    Visit original content creator repository
    https://github.com/merkle-open/nitro-release

  • Miscelanea

    Miscelanea

    In this repository some different projects elaborated on my own are uploaded, such as my project of final degree, future javascript or design web projects, little applications related with Big Data, etc.

    – Graduation project (Civil engineering)

    The work consists in the whole design of a construction project of a road (conventional road) which links the highway A-7 (known as Mediterranean Highway) and the N-340 (a conventional road that passes in a parallel way to the mentioned highway) in the East part of the city of Malaga, very close to Rincón de la Victoria.

    The project just begins supposing that the viability study has been elaborated, every alternatives has benn considered and the route described in the project is the most viable.

    The work is only for academical purposes, in order to offer support for construction projects of roads. The employed language is Spanish.

    The repository only contains a few samples of the project, in case the user needs additional information, please contact me.

    – Report about the most affordable Cloud computing choice to get a Hadoop cluster

    This report is a task for the Master of Big Data, and can be used as an illustrating guide in the work environment.
    This report reflects a research about the Cloud computing providers to get a Hadoop cluster is to use a, supposing that we have already developed a Spark application and our estimation is that we will need a system with at least the following configuration:

    • Processing units: 50 cores

    • Main memory: 100 GB of RAM

    • Storage: 10 TB

    Visit original content creator repository
    https://github.com/JavierFJ/Miscelanea

  • Word2Vec-bias-extraction

    Word2Vec-bias-extraction

    *GitHub repository to accompany research paper in preparation by Alina Arseniev-Koehler and Jacob G. Foster, “Machine learning as a model for cultural learning: teaching an algorithm what it means to be fat.” Published in Sociological Methods & Research and available at: https://journals.sagepub.com/doi/full/10.1177/00491241221122603

    Please cite this repository or paper if reused. Code written in Python 3 in Windows and Gensim 3.*

    This research examines how news reporting on body weight and health is loaded with meanings of gender, morality, health, and socio-economic status (SES). For example, is “overweight” more masculine or feminine? What about “slender,” and “obese”? As described in our paper, qualtiative work suggests that obesity connotes immorality, unhealthiness, low SES, and is considered more problematic for women than for men.

    Paper Abstract: Overweight individuals in the U.S. are disparaged as effeminate, immoral, and unhealthy. These negative conceptions are not intrinsic to obesity; rather, they are the tainted fruit of cultural learning. Scholars often cite media consumption as a key mechanism for learning cultural biases, but have not offered a formal theory of how this public culture becomes private culture. Here we provide a computational account of this learning mechanism, showing that cultural schemata can be learned from news reporting. We extract schemata about obesity from New York Times articles with Word2Vec, a neural language model inspired by human cognition. We identify several cultural schemata around obesity, linking it to femininity, immorality, poor health, and low socioeconomic class. Such schemata may be subtly but pervasively activated by our language; thus, language can chronically reproduce biases (e.g., about body weight and health). Our findings also reinforce ongoing concerns that machine learning can encode, and reproduce, harmful human biases.

    Code in this repository shows our methods to train Word2Vec models (Part A) and then classify words (Part B) with respect to each of these four cultural dimensions (gender, morality, health, and SES), and check robustness of results.

    Part A: Modeling Language with Word2Vec: Train and Explore a Word2Vec Model

    Files needed from this repo:

    • Part_A_W2V_training_performance_exploring.ipynb
    • testing.py
    • questions_words_pasted.txt
    • questions_words.txt

    Files needed from OSF:

    • modelA_ALLYEARS_500dim_10CW

    Description: In Part A, we train a Word2Vec model of text data using Gensim in Python 3. Word2Vec takes words (or phrases) in a text data set and models these as n-dimensional numeric vectors. With enough data, these vectors are meaningful; for example, words taht are mroe similar in meaning (like man and boy) will have similar vectors. For a review of Word2Vec check out this blog post. While illustrate in this notebook how to train a Word2Vec model on public text data, and show how to use Gensim to work with pretrained Word2Vec models and evaluate their quality (such as our models and a publicly available model trained on GoogleNews).

    Part B: Measuring the connotations of obesity in news discourse, with respect to gender, morality, health and social class

    Files needed from this repo:

    • Part_B_Connotations
    • build_lexicon.py
    • word_lists.py
    • dimension.py
    • semantic_svm.py

    Files needed from OSF:

    • modelA_ALLYEARS_500dim_10CW
    • modelA_ALLYEARS_300dim_10CW

    Description: This notebook illustrates the cultural connotations of words about obesity, using Word2Vec models trained on New York Times. In brief, we use geometric methods to first find a vector correspodning to each sematnic direction (gender, morality, health, and social class). We operationalize morality as “purity,” in the code. Upon extracting a dimension, we then project a target word-vector (e.g., “obese”) onto the dimension. Then, we take the cosine similarity between our words about obesity and a given dimension (e.g., the cosine similarity beween the “gender” direction and the word-vector for “overweight.”). This yields a scalar which tells us the direction and magnitude of the connotation – e.g., whether “overweight” connotes masculinity or femininity, and how much masculinity or femininity. Since one Word2Vec model may be instable, in our paper, we report results based on findings from multiple Word2Vec models trained on the same data. See our paper for details on thse methods.

    We also include code to classify words’ connotations by using a machine-learning classifier (a Support Vector Machine). The “features” of a word in this classifcation task are simply the loading on each of the dimensions. The disadvantage to this approach compared to the geometric approaches in Part B is that machine-learning classifiers tend to be way overparametrized for this task, since there are few training examples (e.g., words that correspond to femininity or masculinity) compared to the number of features (dimensions) for each corresponding word-vector (dimensions in a Word2Vec models tend to range from 25-500). We use a Word2Vec model trained with 300 dimensions in this part of our methods, to help address this.

    Visit original content creator repository
    https://github.com/arsena-k/Word2Vec-bias-extraction

  • echor

    echor

    CRAN status echor status badge

    R build status Coverage status DOI

    Overview

    echor downloads wastewater discharge and air emission data for EPA permitted facilities using the EPA ECHO API.

    Installation

    echor is on CRAN:

    install.packages("echor")
    

    Or install the development version:

    install.packages('echor', repos = 'https://mps9506.r-universe.dev')
    

    Usage

    Getting started

    Functions

    Examples

    Download information about facilities with an NPDES permit

    We can look up plants by permit id, bounding box, and numerous other parameters. I plan on providing documentation of available parameters. However, arguments can be looked up here: get_cwa_rest_services_get_facility_info

    library(echor)
    
    ## echoWaterGetFacilityInfo() will return a dataframe or simple features (sf) dataframe.
    
    df <- echoWaterGetFacilityInfo(output = "df", 
                                   p_c1lon = '-96.387509', 
                                   p_c1lat = '30.583572', 
                                   p_c2lon = '-96.281422', 
                                   p_c2lat = '30.640008',
                                   p_ptype = "NPD")
    
    head(df)
    #> # A tibble: 4 × 26
    #>   CWPName            SourceID CWPStreet CWPCity CWPState CWPStateDistrict CWPZip
    #>   <chr>              <chr>    <chr>     <chr>   <chr>    <chr>            <chr> 
    #> 1 CARTERS CREEK WWTP TX00471… 2200 NOR… COLLEG… TX       09               77845 
    #> 2 CENTRAL UTILITY P… TX00027… 1584 TAMU COLLEG… TX       09               77843 
    #> 3 HEAT TRANSFER RES… TX01065… 0.25MI S… COLLEG… TX       09               77845 
    #> 4 TURKEY CREEK WWTP  TX00624… 3000FT W… BRYAN   TX       09               77807 
    #> # ℹ 19 more variables: MasterExternalPermitNmbr <chr>, RegistryID <chr>,
    #> #   EPASystem <chr>, Statute <chr>, FacStdCountyName <chr>,
    #> #   CWPNAICSCodes <chr>, FacLat <dbl>, FacLong <dbl>,
    #> #   CWPTotalDesignFlowNmbr <dbl>, AIRIDs <chr>, CensusBlockGroup <chr>,
    #> #   MileavgOver90CountSt <dbl>, MileOver90CountSt <dbl>,
    #> #   SupOver80CountUsSearch <chr>, SupMileavgOver80CountUs <dbl>,
    #> #   SupMileOver80CountUs <dbl>, SupMileOver80CountUsSearch <chr>, …
    

    The ECHO database can provide over 270 different columns. echor returns a subset of these columns that should work for most users. However, you can specify what data you want returned. Use echoWaterGetMeta() to return a dataframe with column numbers, names, and descriptions to identify the columns you want returned. Then include the column numbers as a comma separated string in the qcolumns argument. In the example below, the qcolumns argument indicates the dataframe will include plant name, 8-digit HUC, latitude, longitude, and total design flow.

    df <- echoWaterGetFacilityInfo(output = "df", 
                                   p_c1lon = '-96.387509', 
                                   p_c1lat = '30.583572', 
                                   p_c2lon = '-96.281422', 
                                   p_c2lat = '30.640008',
                                   qcolumns = '1,14,23,24,25',
                                   p_ptype = "NPD")
    head(df)
    #> # A tibble: 4 × 6
    #>   CWPName                SourceID  FacStdCountyName CWPNAICSCodes FacLat FacLong
    #>   <chr>                  <chr>     <chr>            <chr>          <dbl>   <dbl>
    #> 1 CARTERS CREEK WWTP     TX0047163 BRAZOS COUNTY    <NA>            30.6   -96.3
    #> 2 CENTRAL UTILITY PLANT  TX0002747 BRAZOS COUNTY    <NA>            30.6   -96.3
    #> 3 HEAT TRANSFER RESEARCH TX0106526 BRAZOS COUNTY    <NA>            30.6   -96.4
    #> 4 TURKEY CREEK WWTP      TX0062472 BRAZOS COUNTY    <NA>            30.6   -96.4
    

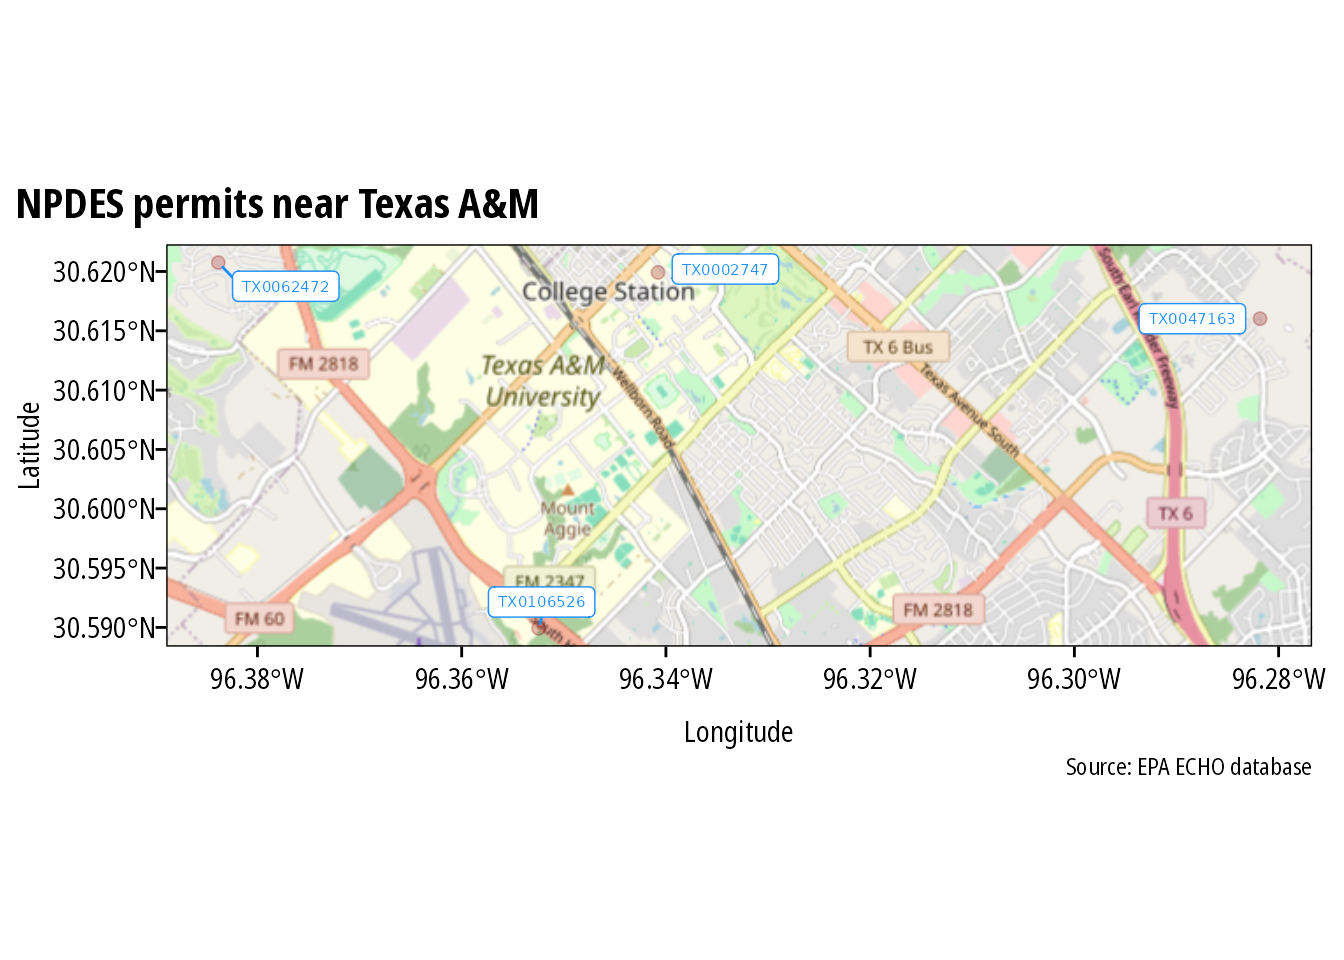
    When returned as sf dataframes, the data is suitable for immediate spatial plotting or analysis.

    library(ggspatial)
    library(sf)
    library(ggrepel)
    library(prettymapr)
    
    df <- echoWaterGetFacilityInfo(output = "sf", 
                                   p_c1lon = '-96.387509', 
                                   p_c1lat = '30.583572', 
                                   p_c2lon = '-96.281422', 
                                   p_c2lat = '30.640008',
                                   p_ptype = "NPD")
    
    
    ggplot(df) +
      annotation_map_tile(zoomin = -1, progress = "none") +
      geom_sf(inherit.aes = FALSE, shape = 21, 
              color = "darkred", fill = "darkred", 
              size = 2, alpha = 0.25) +
      geom_label_repel(data = df, aes(label = SourceID,
                                      geometry = geometry),
                       stat = "sf_coordinates",
                       point.padding = .5, min.segment.length = 0.1,
                       size = 2, color = "dodgerblue") +
      theme_mps_noto() +
      labs(x = "Longitude", y = "Latitude", 
           title = "NPDES permits near Texas A&M",
           caption = "Source: EPA ECHO database")
    

    Download discharge/emissions data

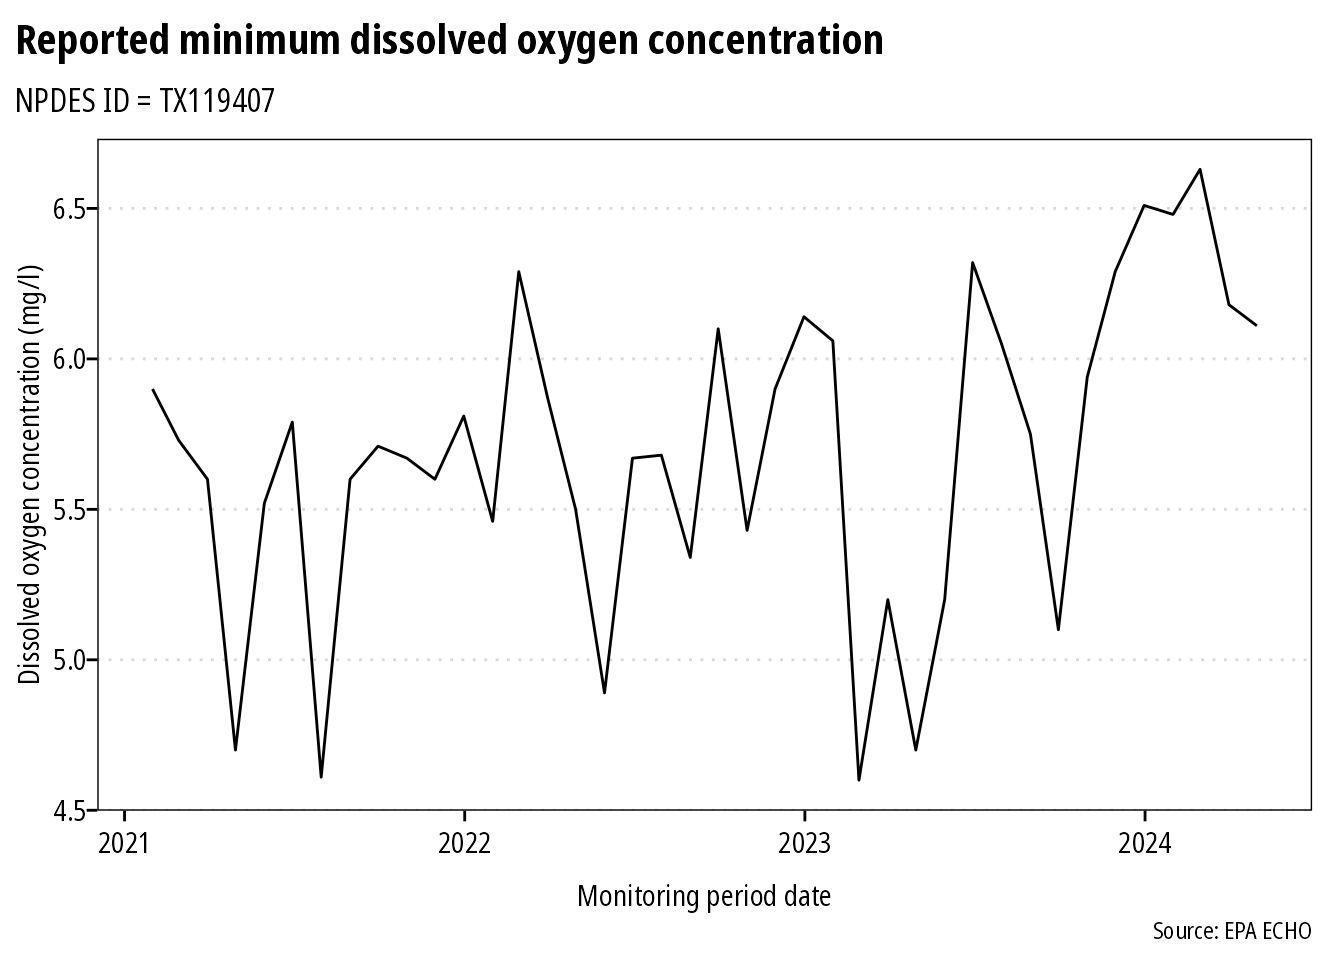
    Use echoGetEffluent() or echoGetCAAPR() to download tidy dataframes of permitted water discharger Discharge Monitoring Report (DMR) or permitted emitters Clean Air Act annual emissions reports. Please note that all variables are returned as character vectors.

    df <- echoGetEffluent(p_id = 'tx0119407', parameter_code = '00300')
    
    df <- df %>%
      mutate(dmr_value_nmbr = as.numeric(dmr_value_nmbr),
             monitoring_period_end_date = as.Date(monitoring_period_end_date,
                                                  "%m/%d/%Y")) %>%
      filter(!is.na(dmr_value_nmbr) & limit_value_type_code == "C1")
    
    ggplot(df) +
      geom_line(aes(monitoring_period_end_date, dmr_value_nmbr)) +
      theme_mps_noto() +
      labs(x = "Monitoring period date",
           y = "Dissolved oxygen concentration (mg/l)",
           title = "Reported minimum dissolved oxygen concentration",
           subtitle = "NPDES ID = TX119407",
           caption = "Source: EPA ECHO")
    

    Session Info

    sessioninfo::platform_info()
    #>  setting  value
    #>  version  R version 4.4.0 (2024-04-24)
    #>  os       Ubuntu 22.04.4 LTS
    #>  system   x86_64, linux-gnu
    #>  ui       X11
    #>  language (EN)
    #>  collate  C.UTF-8
    #>  ctype    C.UTF-8
    #>  tz       UTC
    #>  date     2024-05-15
    #>  pandoc   3.1.11 @ /opt/hostedtoolcache/pandoc/3.1.11/x64/ (via rmarkdown)
    
    sessioninfo::package_info()
    #>  ! package      * version    date (UTC) lib source
    #>    abind          1.4-5      2016-07-21 [1] CRAN (R 4.4.0)
    #>    bit            4.0.5      2022-11-15 [1] CRAN (R 4.4.0)
    #>    bit64          4.0.5      2020-08-30 [1] CRAN (R 4.4.0)
    #>  P class          7.3-22     2023-05-03 [?] CRAN (R 4.4.0)
    #>    classInt       0.4-10     2023-09-05 [1] CRAN (R 4.4.0)
    #>    cli            3.6.2      2023-12-11 [1] CRAN (R 4.4.0)
    #>  P codetools      0.2-20     2024-03-31 [?] CRAN (R 4.4.0)
    #>    colorspace     2.1-0      2023-01-23 [1] CRAN (R 4.4.0)
    #>    crayon         1.5.2      2022-09-29 [1] CRAN (R 4.4.0)
    #>    curl           5.2.1      2024-03-01 [1] CRAN (R 4.4.0)
    #>    DBI            1.2.2      2024-02-16 [1] CRAN (R 4.4.0)
    #>    digest         0.6.35     2024-03-11 [1] CRAN (R 4.4.0)
    #>    dplyr        * 1.1.4      2023-11-17 [1] CRAN (R 4.4.0)
    #>    e1071          1.7-14     2023-12-06 [1] CRAN (R 4.4.0)
    #>    echor        * 0.1.9.9999 2024-05-15 [1] local
    #>    evaluate       0.23       2023-11-01 [1] CRAN (R 4.4.0)
    #>    fansi          1.0.6      2023-12-08 [1] CRAN (R 4.4.0)
    #>    farver         2.1.2      2024-05-13 [1] CRAN (R 4.4.0)
    #>    fastmap        1.2.0      2024-05-15 [1] CRAN (R 4.4.0)
    #>    fs             1.6.4      2024-04-25 [1] CRAN (R 4.4.0)
    #>    generics       0.1.3      2022-07-05 [1] CRAN (R 4.4.0)
    #>    ggplot2      * 3.5.1      2024-04-23 [1] CRAN (R 4.4.0)
    #>    ggrepel      * 0.9.5      2024-01-10 [1] CRAN (R 4.4.0)
    #>    ggspatial    * 1.1.9      2023-08-17 [1] CRAN (R 4.4.0)
    #>    glue           1.7.0      2024-01-09 [1] CRAN (R 4.4.0)
    #>    gtable         0.3.5      2024-04-22 [1] CRAN (R 4.4.0)
    #>    highr          0.10       2022-12-22 [1] CRAN (R 4.4.0)
    #>    hms            1.1.3      2023-03-21 [1] CRAN (R 4.4.0)
    #>    htmltools      0.5.8.1    2024-04-04 [1] CRAN (R 4.4.0)
    #>    httr           1.4.7      2023-08-15 [1] CRAN (R 4.4.0)
    #>    jsonlite       1.8.8      2023-12-04 [1] CRAN (R 4.4.0)
    #>  P KernSmooth     2.23-22    2023-07-10 [?] CRAN (R 4.4.0)
    #>    knitr          1.46       2024-04-06 [1] CRAN (R 4.4.0)
    #>    labeling       0.4.3      2023-08-29 [1] CRAN (R 4.4.0)
    #>  P lattice        0.22-6     2024-03-20 [?] CRAN (R 4.4.0)
    #>    lifecycle      1.0.4      2023-11-07 [1] CRAN (R 4.4.0)
    #>    magrittr       2.0.3      2022-03-30 [1] CRAN (R 4.4.0)
    #>  P mpsTemplates * 0.2.0      2024-05-15 [?] Github (mps9506/mpsTemplates@d7a070e)
    #>    munsell        0.5.1      2024-04-01 [1] CRAN (R 4.4.0)
    #>    pillar         1.9.0      2023-03-22 [1] CRAN (R 4.4.0)
    #>    pkgconfig      2.0.3      2019-09-22 [1] CRAN (R 4.4.0)
    #>    plyr           1.8.9      2023-10-02 [1] CRAN (R 4.4.0)
    #>    png            0.1-8      2022-11-29 [1] CRAN (R 4.4.0)
    #>    prettymapr   * 0.2.5      2024-02-23 [1] CRAN (R 4.4.0)
    #>    prettyunits    1.2.0      2023-09-24 [1] CRAN (R 4.4.0)
    #>    progress       1.2.3      2023-12-06 [1] CRAN (R 4.4.0)
    #>    proxy          0.4-27     2022-06-09 [1] CRAN (R 4.4.0)
    #>    purrr          1.0.2      2023-08-10 [1] CRAN (R 4.4.0)
    #>    R6             2.5.1      2021-08-19 [1] CRAN (R 4.4.0)
    #>  P ragg         * 1.3.1      2024-05-06 [?] RSPM (R 4.4.0)
    #>    raster         3.6-26     2023-10-14 [1] CRAN (R 4.4.0)
    #>    Rcpp           1.0.12     2024-01-09 [1] CRAN (R 4.4.0)
    #>    readr          2.1.5      2024-01-10 [1] CRAN (R 4.4.0)
    #>    renv           1.0.7      2024-04-11 [1] RSPM (R 4.4.0)
    #>    rlang          1.1.3      2024-01-10 [1] CRAN (R 4.4.0)
    #>    rmarkdown      2.26       2024-03-05 [1] CRAN (R 4.4.0)
    #>    rosm           0.3.0      2023-08-27 [1] CRAN (R 4.4.0)
    #>    scales         1.3.0      2023-11-28 [1] CRAN (R 4.4.0)
    #>    sessioninfo    1.2.2      2021-12-06 [1] any (@1.2.2)
    #>    sf           * 1.0-16     2024-03-24 [1] CRAN (R 4.4.0)
    #>    sp             2.1-4      2024-04-30 [1] CRAN (R 4.4.0)
    #>    systemfonts    1.1.0      2024-05-15 [1] CRAN (R 4.4.0)
    #>    terra          1.7-71     2024-01-31 [1] CRAN (R 4.4.0)
    #>  P textshaping    0.3.7      2023-10-09 [?] RSPM (R 4.4.0)
    #>    tibble         3.2.1      2023-03-20 [1] CRAN (R 4.4.0)
    #>    tidyr          1.3.1      2024-01-24 [1] CRAN (R 4.4.0)
    #>    tidyselect     1.2.1      2024-03-11 [1] CRAN (R 4.4.0)
    #>    tzdb           0.4.0      2023-05-12 [1] CRAN (R 4.4.0)
    #>    units          0.8-5      2023-11-28 [1] CRAN (R 4.4.0)
    #>    utf8           1.2.4      2023-10-22 [1] CRAN (R 4.4.0)
    #>    vctrs          0.6.5      2023-12-01 [1] CRAN (R 4.4.0)
    #>    vroom          1.6.5      2023-12-05 [1] CRAN (R 4.4.0)
    #>    withr          3.0.0      2024-01-16 [1] CRAN (R 4.4.0)
    #>    xfun           0.44       2024-05-15 [1] CRAN (R 4.4.0)
    #>    yaml           2.3.8      2023-12-11 [1] CRAN (R 4.4.0)
    #> 
    #>  [1] /home/runner/.cache/R/renv/library/echor-4ec080d0/linux-ubuntu-jammy/R-4.4/x86_64-pc-linux-gnu
    #>  [2] /home/runner/.cache/R/renv/sandbox/linux-ubuntu-jammy/R-4.4/x86_64-pc-linux-gnu/3df92652
    #> 
    #>  P ── Loaded and on-disk path mismatch.
    
    Visit original content creator repository https://github.com/mps9506/echor